
Logistic Flow Control (LFC)
We are excited to announce a first release of Logistic Flow Control!
The component is ready for trials at early adopters before it will become generally available.
Logistic Flow Control is a new module that aims at improving the integration between the shopfloor and the warehouse, it focusses on shopfloor logistic use cases and tasks such as:
-
Get the material from the warehouse to the shopfloor, at the right place at the right time.
-
Move the WIP from one workstation to the next.
-
Get subassemblies from the production line back to the warehouse.
-
Get WIP ready for transport to a supplier for outsourced work.
In all these tasks, production touches intra-company logistics. A lot of manufacturers struggle to organize these interactions in an efficient way: material arrives too late at the line, operators search for WIP or tasks are not grouped for efficiency.
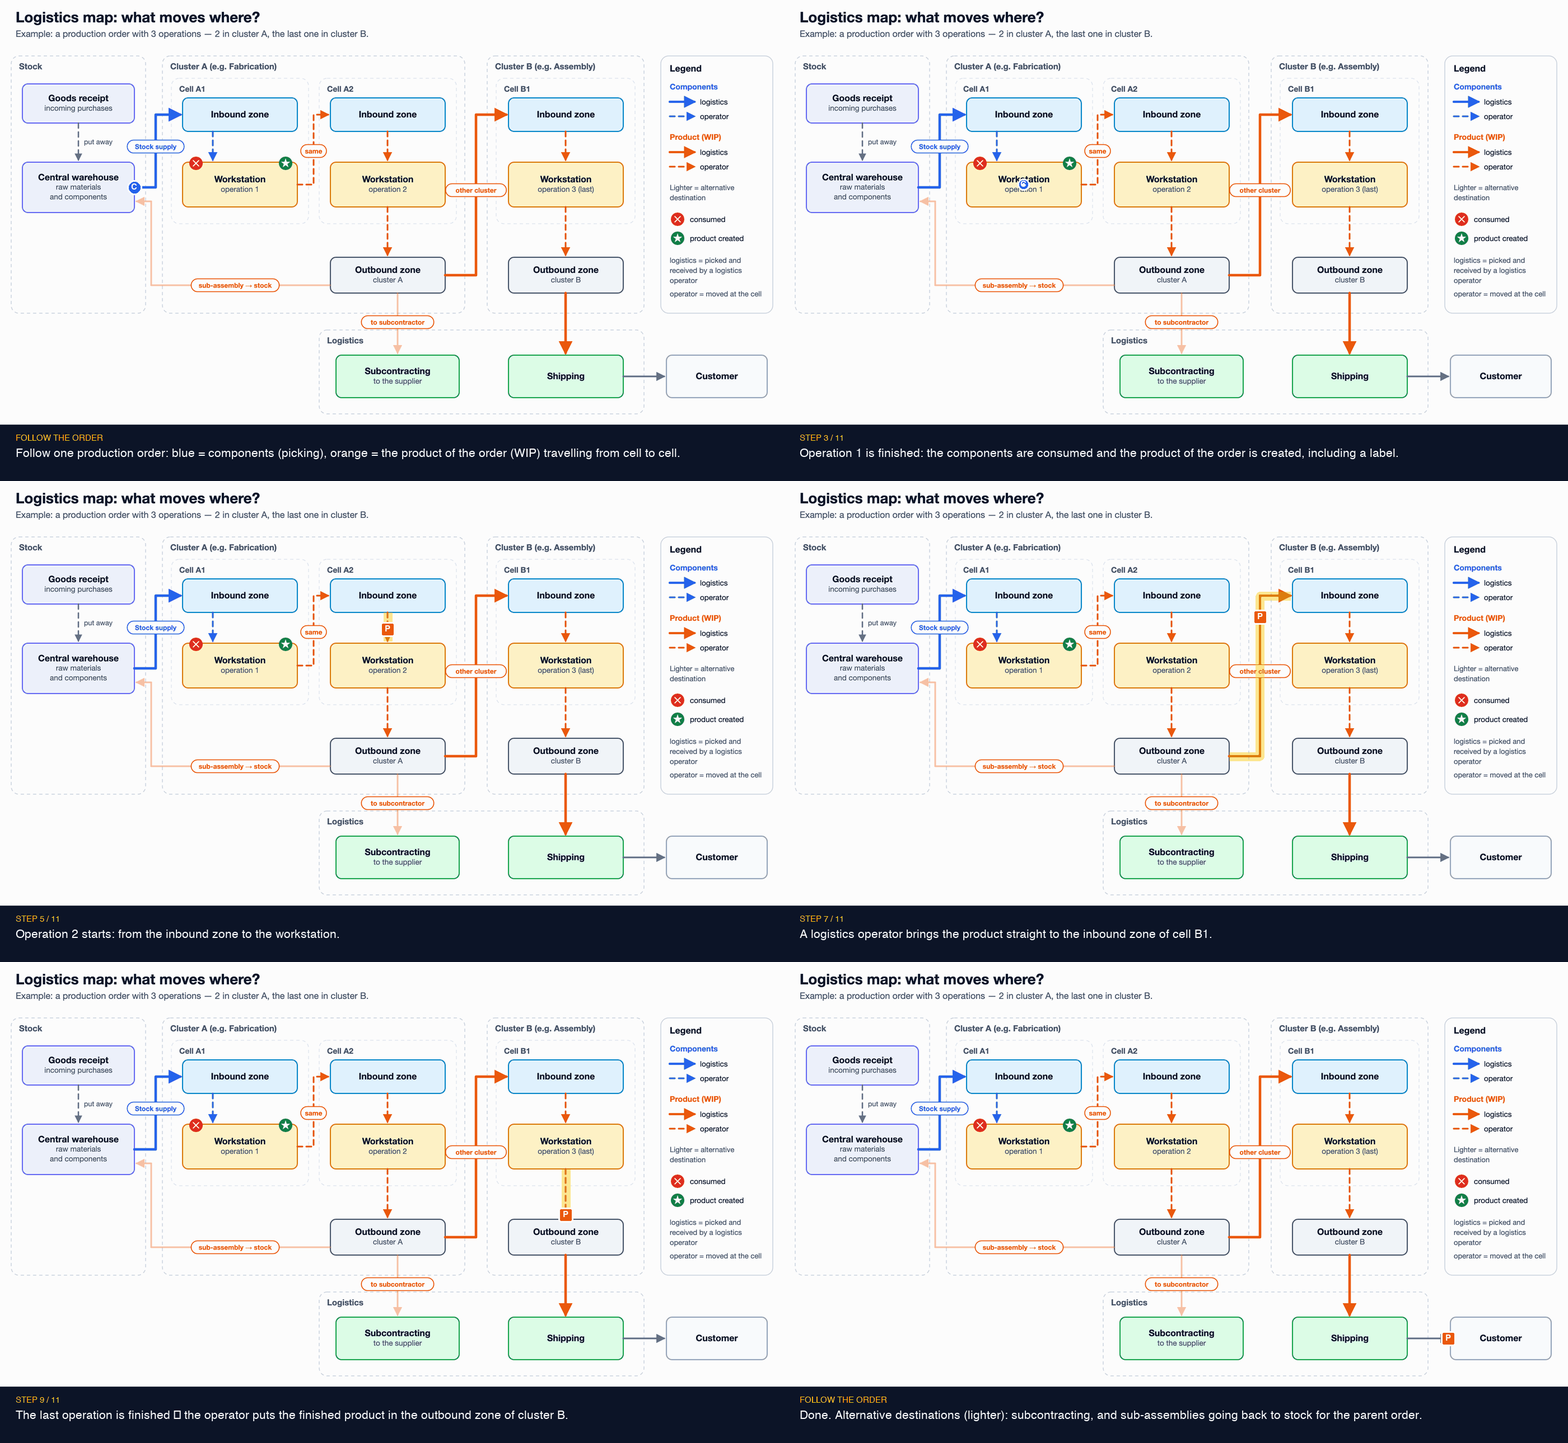
Let’s illustrate the concept with a concrete example with one production order, three operations in two clusters. Blue are the components that are picked for the first operation; orange is the product of the order, travelling from cell to cell until it is shipped to the customer. The blue and orange movements is where LFC comes into play.
From an architectural perspective 24LFC looks as follows:
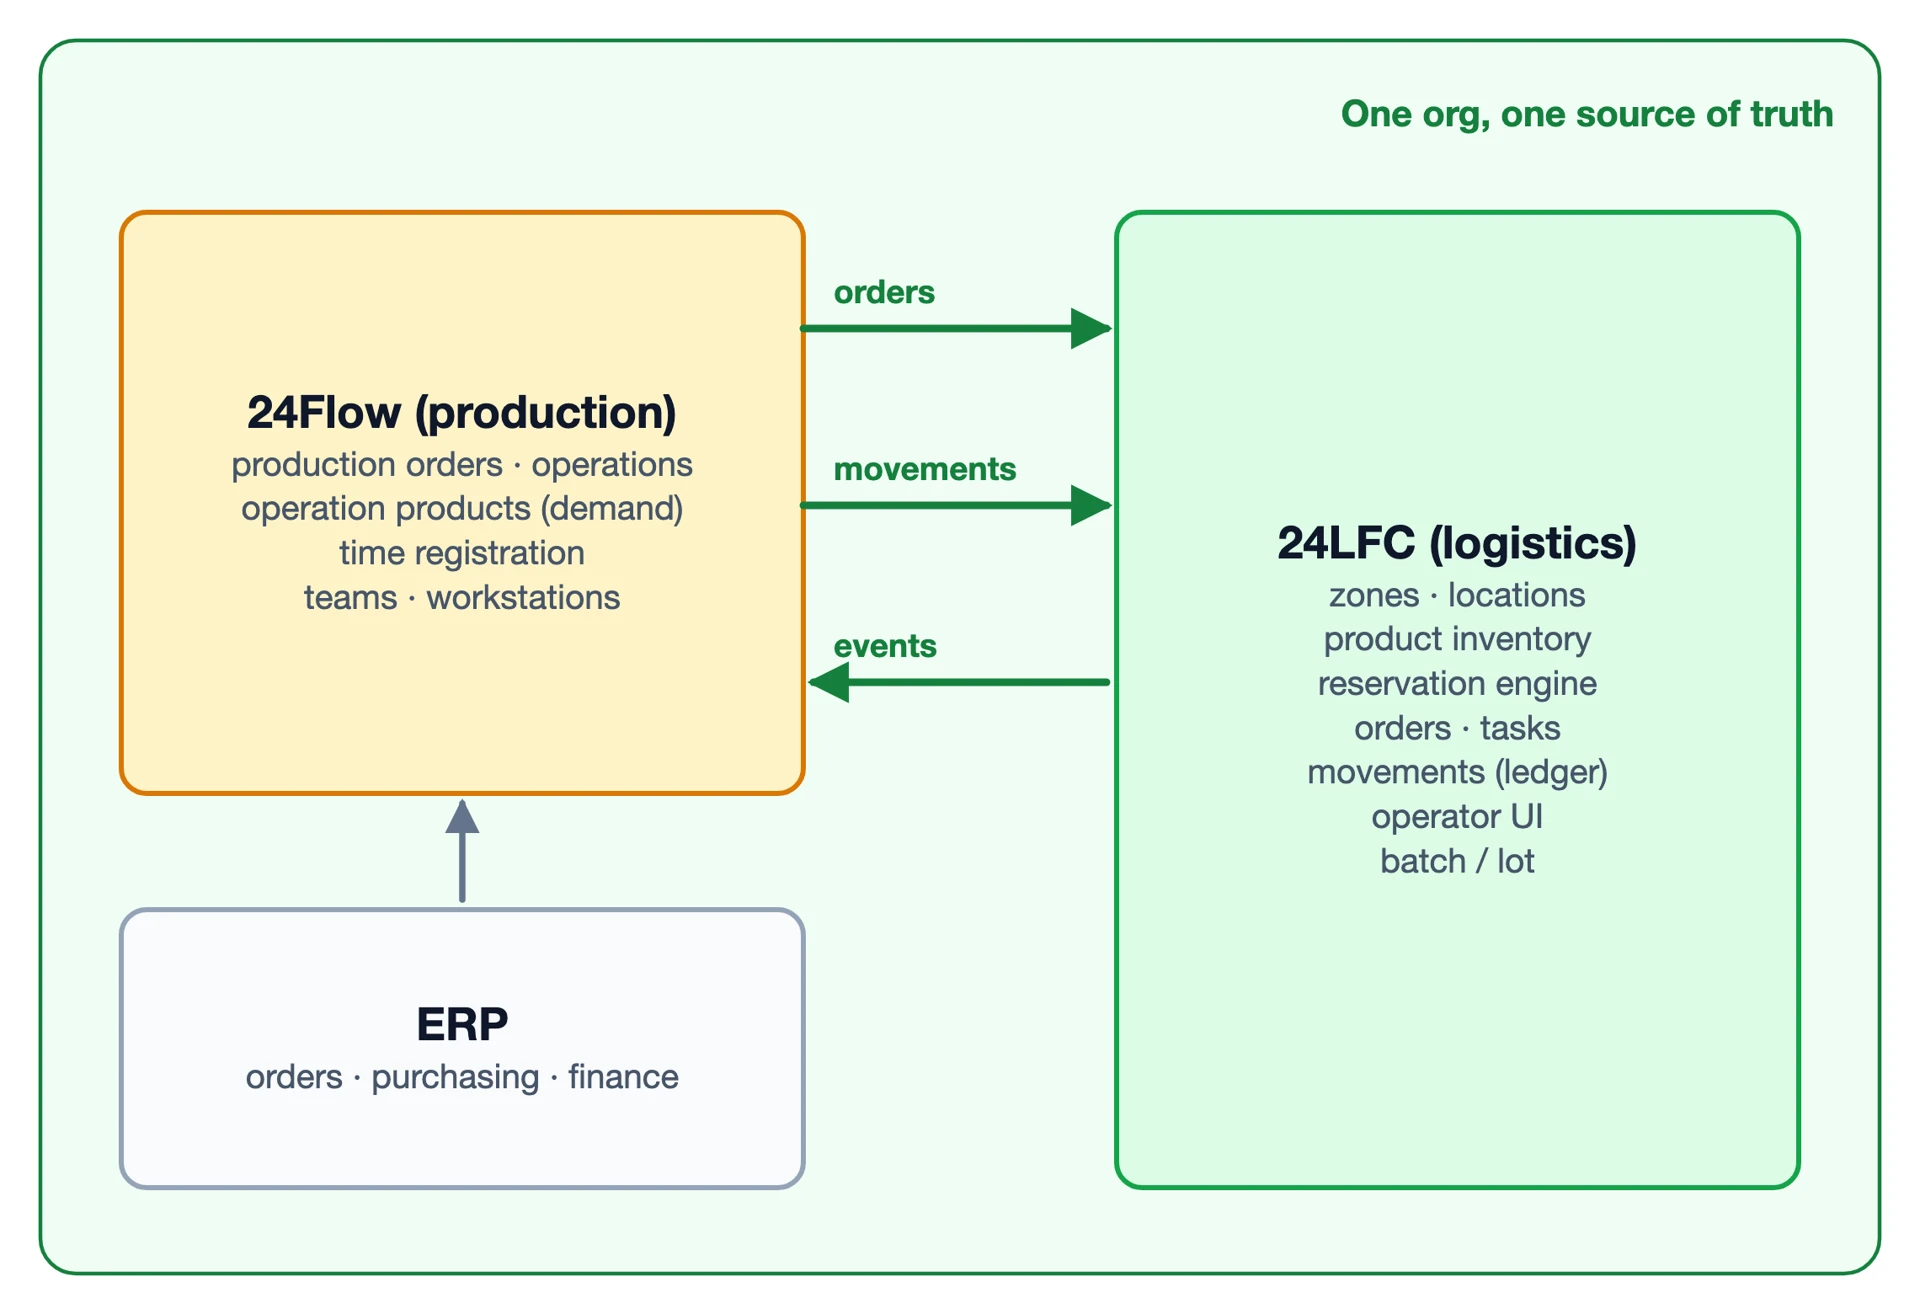
24LFC is deployed as a separate component and interacts with 24Flow. Production and logistics are deployed in the same Salesforce org: 24Flow drives production, 24LFC runs the warehouse, and both share the same records instead of syncing with an external WMS.
24Planning
Capacity View
24Flow can show capacity and occupation of team and machines already for a long time. What is new, is that can now also be shown in a separate panel, both for Resource Planning as well as for Gantt.
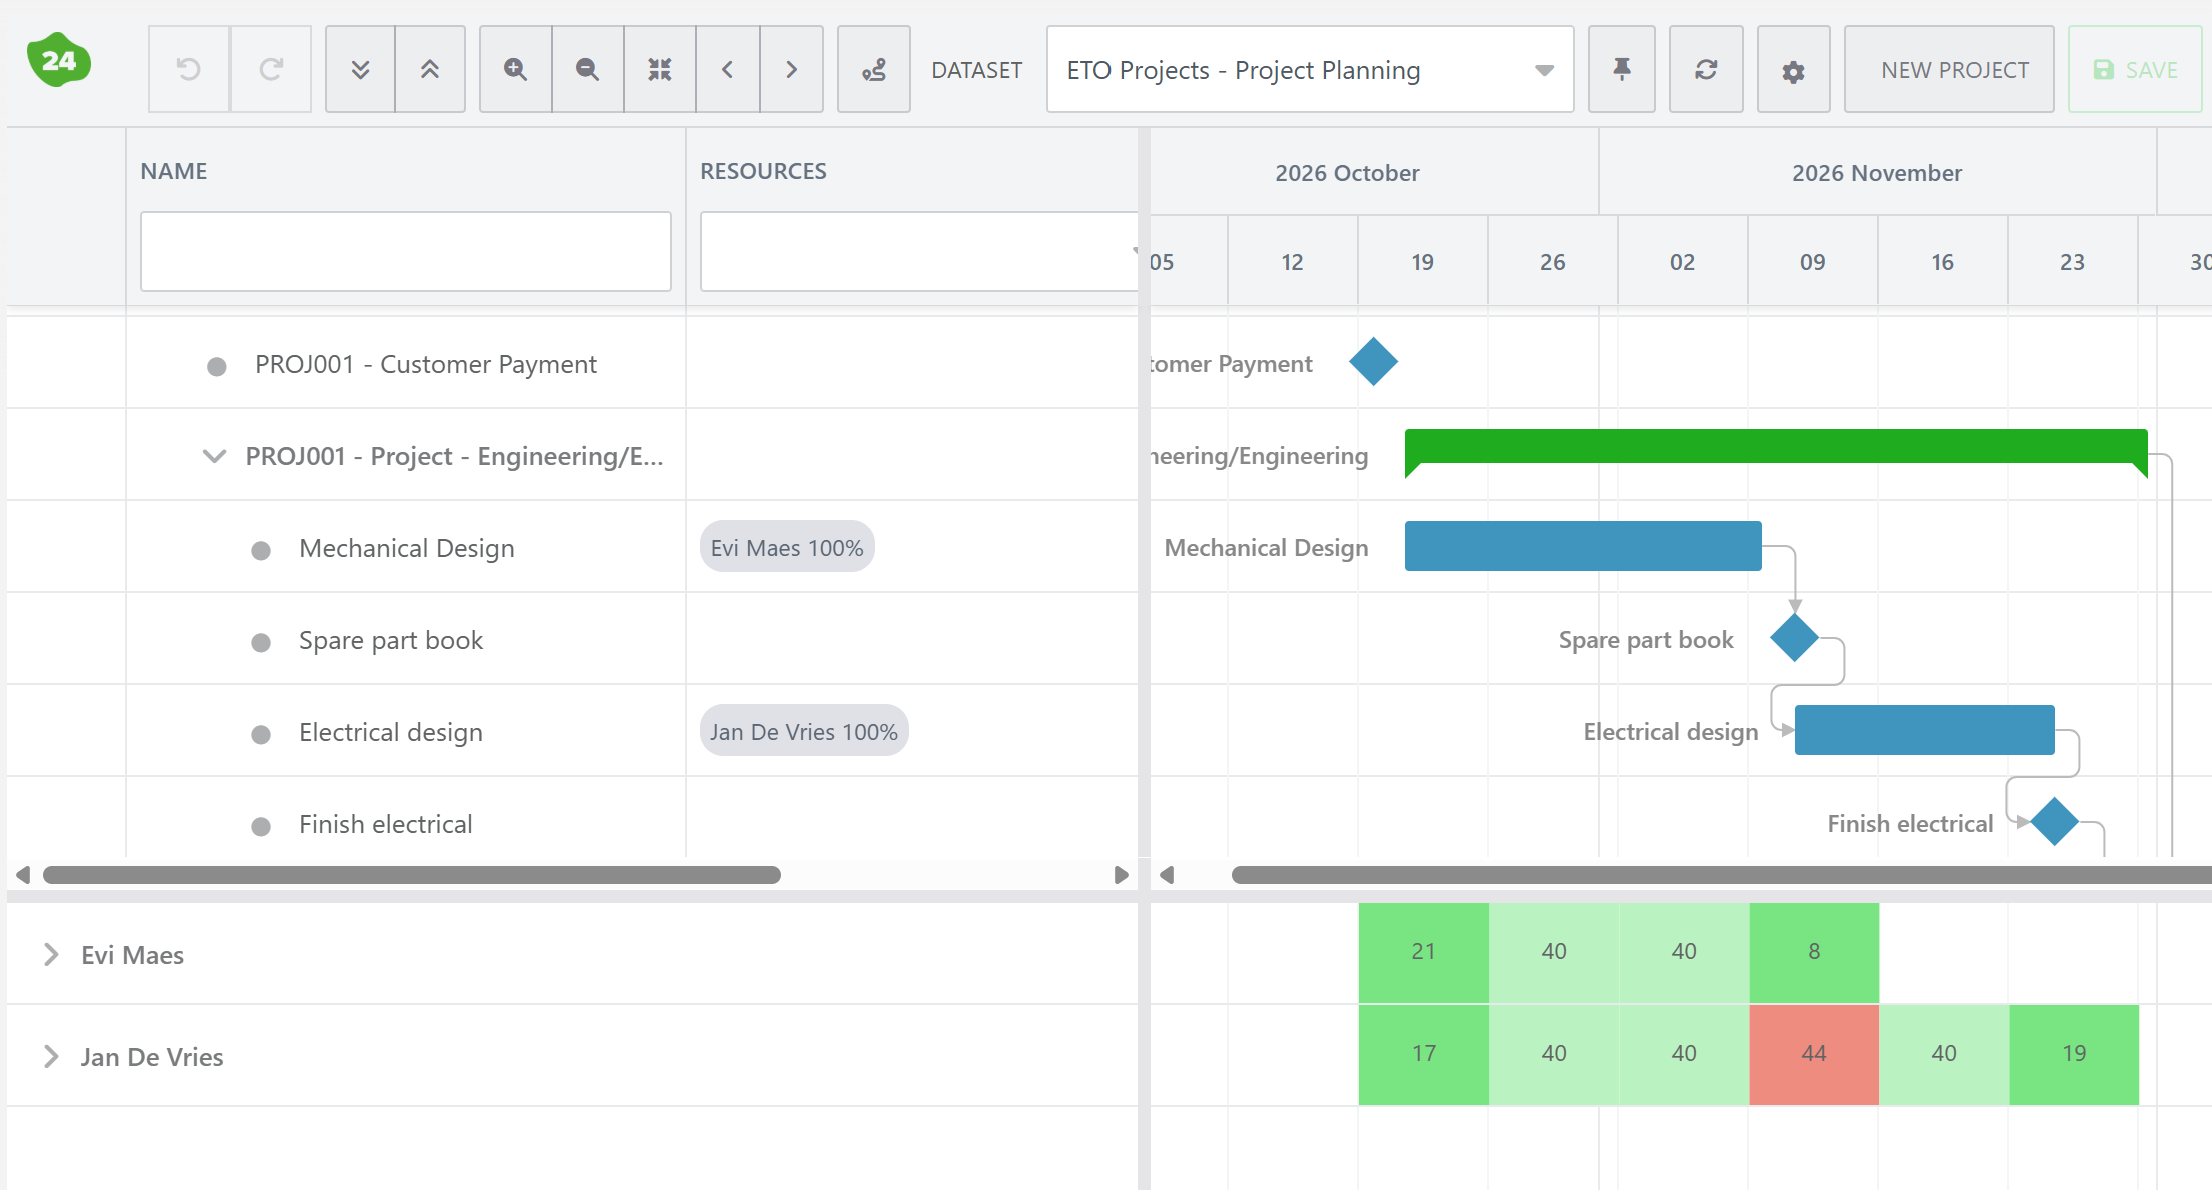
The capacity can be represented either as a ‘histogram’ or a numerical value.
The above screenshot shows the capacity view as a separate panel. Alternatively, it can be shown inline with the resource. For Gantt data sets, only the Panel location makes sense.
You can define occupation and capacity the way you want via a custom field. If it is left empty, the occupation will be computed based on the duration of tasks.
More information on the dataset configuration for capacity can be found here.
Resource Matching
24Planning supports a framework for validating the assignment of events to particular resources. I.e. the events may require specific properties of a resource and you can validate whether resources have these matching properties. In case there is no match, the event cannot be assigned to the resource.
One obvious application of this framework is skill matching where certain tasks (events) require a particular skill set of the person (resource). With the validation framework, planners will not be able to assign tasks to people that do not have the appropriate skills. Another example is when production orders require certain properties of a machine.
The framework is not limited to one property only, i.e. an event could require multiple resource properties, as the video below illustrates.
More information on skill matching configuration can be found here.
Local Caching
24Planning now comes with a local caching strategy for both Resource Scheduling and Gantt. This greatly improves usability when switching back and forth between 24Planning tabs, as the local caching will preserve the following settings:
-
Events do not need to be reloaded when navigating back to the planning view, which saves time.
-
24Planning does not switch back to default timeframe (e.g. this week), but stays on the time window you last visited, so that you maintain context.
-
If you have widened the resource or unplanned events pane, that setting will be maintained.
-
If you have hidden columns in the resource or unplanned events pane, those remain hidden.
This implies that the dataset provides the default look-and-feel settings for columns, pane widths etc. but once you customize them to your own liking, your settings will be persisted.
Assign Multiple Resources
It is now possible to assign multiple resources to an event, e.g. multiple persons working on the same task. The screenshot below shows two persons assigned to the same task in a Gantt Chart.

In order to be able to assign multiple resources, you need to configure the datasource resources section appropriately.
If your use case requires multiple resources per event, those need to be defined via a junction object. If there is a single resource only, this resource is defined as a lookup from the event.
More information can be found here.
Custom View Presets
24Planning support default day, week, month, etc. header views, as in the example week view shown below.

24Planning now allows you to override this standard base configuration via the View Preset Custom Metadata Types.
The format is {w.}W MM YYYY, where the text between the curly braces is a fixed text string. So in case you want to show only the weeks in the header, you can use the header format {w.}W.
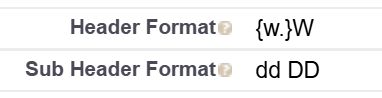

If you are upgrading from an older release, you may need to add the Header Format and Sub Header Format to the View Preset Page Layout.
More information can be found here.
View Resource
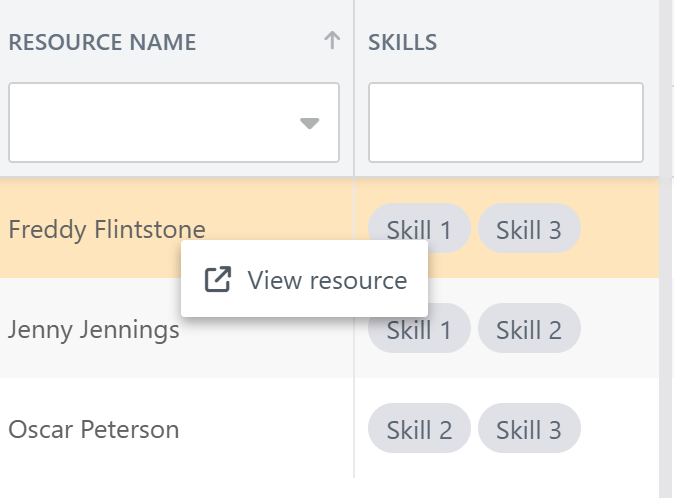
You can now right-click on a resource in the left pane to navigate directly to the resource record page. The behavior is similar to that for events.
Dependency Routing
Dependency Routing is a technical topic with interesting practical use cases. In short, dependency routing allows to model complex production orders or projects with operations that can either be sequential or parallel. The dependencies between tasks can be:
-
End to Start -the dependent task cannot start before the preceding task ends.
-
Start to Start - the succeeding task cannot start before the start of the preceding task.
-
End to End - the succeeding task cannot finish before the completion of the preceding task.
-
Start to End - the successor cannot finish before the predecessor has started.
The Winter '27 release now allows you to model these dependencies at the production type level (Operation Type Assignments to be more specific). The practical consequence is that you can now more easily create template projects or production types for complex orders.
Team Cockpit
There are miscellaneous improvements in the team cockpit:
-
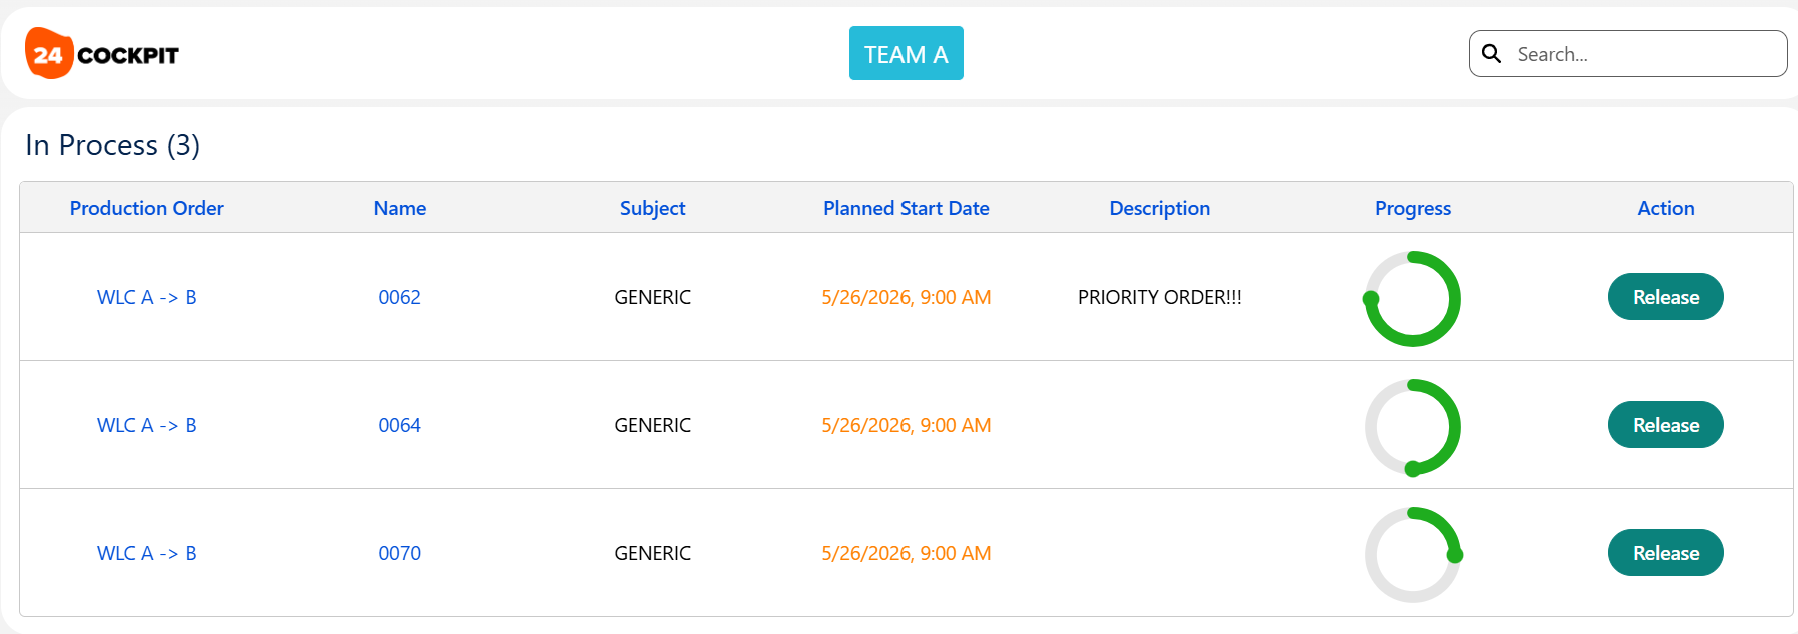
Better representation of the progress of an Operation or Operation Routing. We expanded this feature so it’s more customizable: admins can now separately decide for Operation vs Operation Routing, which field is used as progress, whether extra / custom labels need to be shown, where and how these labels are shown, and what progress view may be applied (progress bar or progress ring). Learn more here.
-
A additional barcode scanner screen component is available for multiple consecutive scans.
-
Time Activities have been reworked to allow more granular control: when operations are set to finalized; how output traces, quantity completed and percentage of completion are set. Read more here.
24Checklist
See who completed the check when
The Checklist Check Results contain detailed information on who completed each check and at what time. In some cases, it can be useful to expose that information to end-users as well, e.g. when you work with multiple persons on the same checklist, or when completing the checklist is spread over a long period of time.
Therefore, you now have the option to display the name and time stamp of completion on the checklist itself on the record page.

More on the configuration here, look for the Show Confirmed On and Show Confirmed by options.
Save time by prefilling check results
24Checklist already supports placeholder values for checks, to guide users on the required input.
Prefilled values go one step further: if your checks have a standard value in most cases, you can prefill this value so that the only task left for the user is to confirm the check.
The prefilled values can be set via a Flow as explained here.
Give your Checklist Instance a name
In a previous release, we introduced the capability to generate multiple instances of the same checklist for a single record. These checklist get a default name based on the time stamp on which the were created.
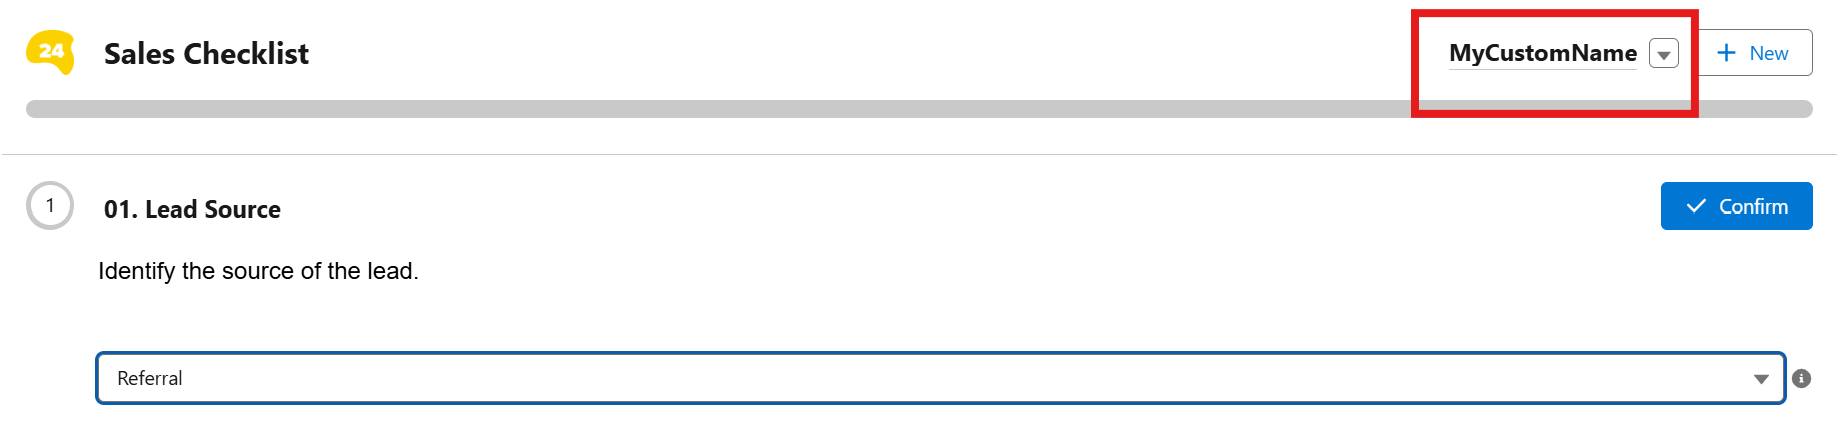
Now, you can give your checklist instances a custom name, either set by an admin in the back-end or chosen by the end-user on the record page.
More on the configuration here, look for the Instance Display Name section.
24Files
Copilot Integration
24Files now integrates with the Microsoft 365 Copilot Retrieval API, which allows you to search for documents and their content within your record folder.
The Microsoft Retrieval API achieves RAG (Retrieval Augmented Generation) by extracting up-to-date and relevant text snippets from SharePoint. The Retrieval API keeps your data in place and upholds your access and governance controls. The Retrieval API ensures that synthesized responses are informed by the latest and most relevant data. This process enhances the reliability and usefulness of your generative AI solutions.
The API supports natural language queries and uses the Microsoft 365 Copilot stack to retrieve relevant grounding context within the Microsoft 365 trust boundary. Within an organization, the permissions model in Microsoft 365 ensures that individuals can only get results from the content they are allowed to access.
When Copilot is enabled, an additional icon appears in the 24Files component:
Clicking on the icon brings you to a search popup:
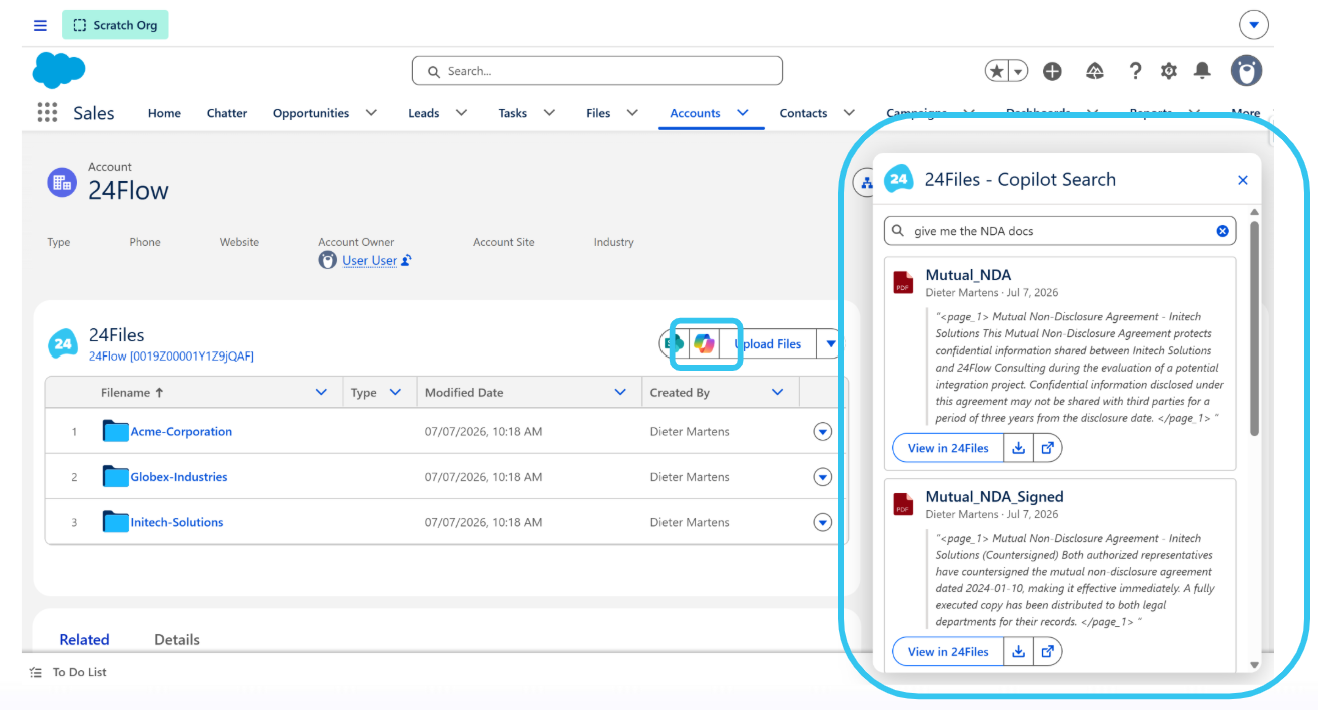
Read more here or watch the video below.
If you want to enable Copilot, contact the 24Files team who can activate the feature on your Salesforce ORG(s).
Document Process Automation
Document process automation has always been at the core of 24Files with features such as automated folder creation, automated transfer of files from Salesforce storage to SharePoint and the large library of Apex actions available to build custom automation Flows.
The latter has grown even more important, and we have added a number of new features to facilitate even richer document process automation:
-
Generate Chatter File Links via an invocable Apex action. Chatter file links are records that contain the path to files on SharePoint. More info here.
In addition, there is a new option in the Folder Structure definition to enable/disable Chatter File Link generation for the record folder and/or its subfolders. For large ORGs that can potentially generate a lot of Chatter File Links, this gives you more granular control.
-
The Migrate File Batch Upload action has been extended. You can now specify to ignore certain file extensions when uploading files to SharePoint.
-
The List Files in Record invocable Apex method lets you retrieve a list of SharePoint files for a Salesforce record. This method gives your Flows or other Apex processes a way to see what’s in a folder without needing anyone to click around. Check it out
It works for both recursive searches across all subfolders or targeted searches in a single folder, so you can use it to check how many files exist, find specific file types, or generate simple file reports. Learn more here.
-
In addition, we have extended support for duplicate file handling. By default, when a file is uploaded to SharePoint with a duplicate filename, SharePoint replaces the existing file. The previous version can still be accessed through the version history. Duplicate Filename Behavior, configured on the Folder Structure, lets you choose whether 24Files should overwrite, rename, or block these uploads. Read more here.
Second Generation Packaging
Since the original release of 24Files, Salesforce has introduced Second-Generation Packaging (2GP). Salesforce is phasing out support for first-generation packaging, so we have also adopted second-generation packaging in the Winter '27 Release.
To upgrade to second-generation packaging, you must follow these steps precisely:
-
Upgrade to the latest version of the first-generation package (1GP v7.90):
-
Upgrade your sandbox environment:
https://test.salesforce.com/packaging/installPackage.apexp?p0=04tbm000000a1C5AAI -
Upgrade your production environment:
https://login.salesforce.com/packaging/installPackage.apexp?p0=04tbm000000a1C5AAI
-
-
Install the same release, but as a second-generation package (2GP 7.90-2):
-
Upgrade your sandbox environment:
https://test.salesforce.com/packaging/installPackage.apexp?p0=04tcj000001G0Y9AAK -
Upgrade your production environment: https://login.salesforce.com/packaging/installPackage.apexp?p0=04tcj000001G0Y9AAK
-
-
Optionally, upgrade to the latest release of 24Files available on the AppExchange.
For new installs of 24Files, these upgrade steps are not required — you can start directly with the 2GP package.
Releases
24Flow v5.02 to v5.31