
Welcome to the 24Flow Summer '26 release notes!
We have plenty of new capabilities to talk about:
-
Workload Control for centralized WIP management in HMLV production.
-
Serial number framework for traceability and genealogy in high-tech.
-
Business Central connector.
-
MCP server for connecting 24Flow with your favorite LLM.
-
Time Warp for visualizing events on a production order.
-
Team Cockpit enhancements such as highlighting and multi-operation selection.
-
24Planninng enhancements including a new sequencing component and performance improvements.
-
24Checklist got a major update with multi-checklist support, a more compact design and lots of other improvements.
-
24Files now works without a public folder and SharePoint metadata support has been extended.
Here is a recording of the Release Webinar, more details are provided below.
Workload Control
Workload Control is a centralized WIP (Work-In-Process) management methodology for High-Mix Low-Volume production environments. It provides a consistent framework for releasing orders by taking into account the WIP for each team or workcenter.
In manufacturing, it is important not to release too many orders at the same time, as you may build up an excessive amount of WIP on the shopfloor. On the other hand, releasing too few orders may lead to workstations running idle. Hence, one needs an approach to release the right amount of orders and balance throughput and WIP. This is what Workload Control is all about. Workload Control helps you to avoid the trap where you release orders just to make sure everybody is busy. When implemented effectively, Workload Control will maximize throughput & output while keeping WIP under control.
In 24Flow, Workload Control works hand-in-hand with Order Pool as explained in this video (concept + demo). Read more on Workload Control in the 24Flow Documentation.
Serial Number Component
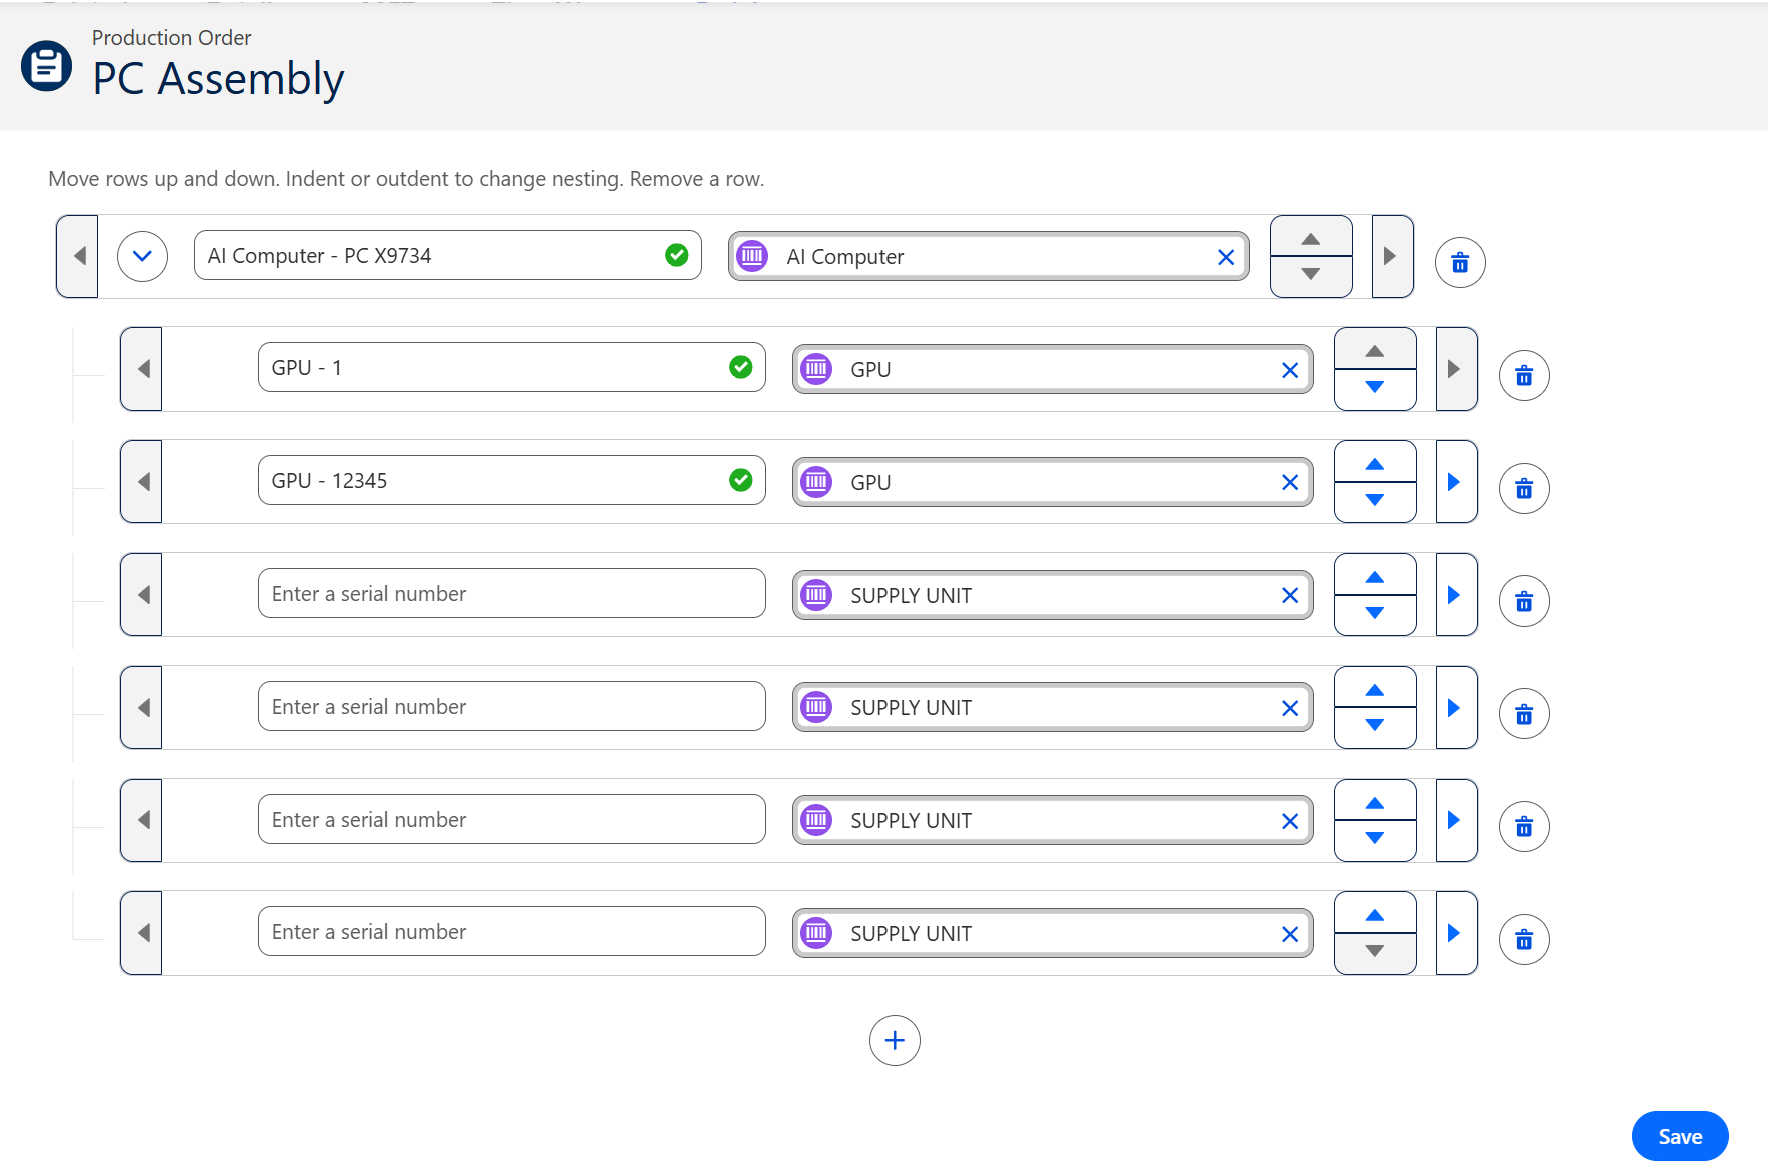
In industries such as high-tech, you want to track the serial numbers of components that are used in a particular assembly. These serial numbers may be nested according to a predefined hierarchy.
The screenshot below shows the serial number component for a production order, where we have a two-level hierarchy. By scanning components, the hierarchy gets filled in and you maintain an as-built serial number hierarchy for traceability.
Read more on the Serial Number Framework configuration here.
Business Central Connector
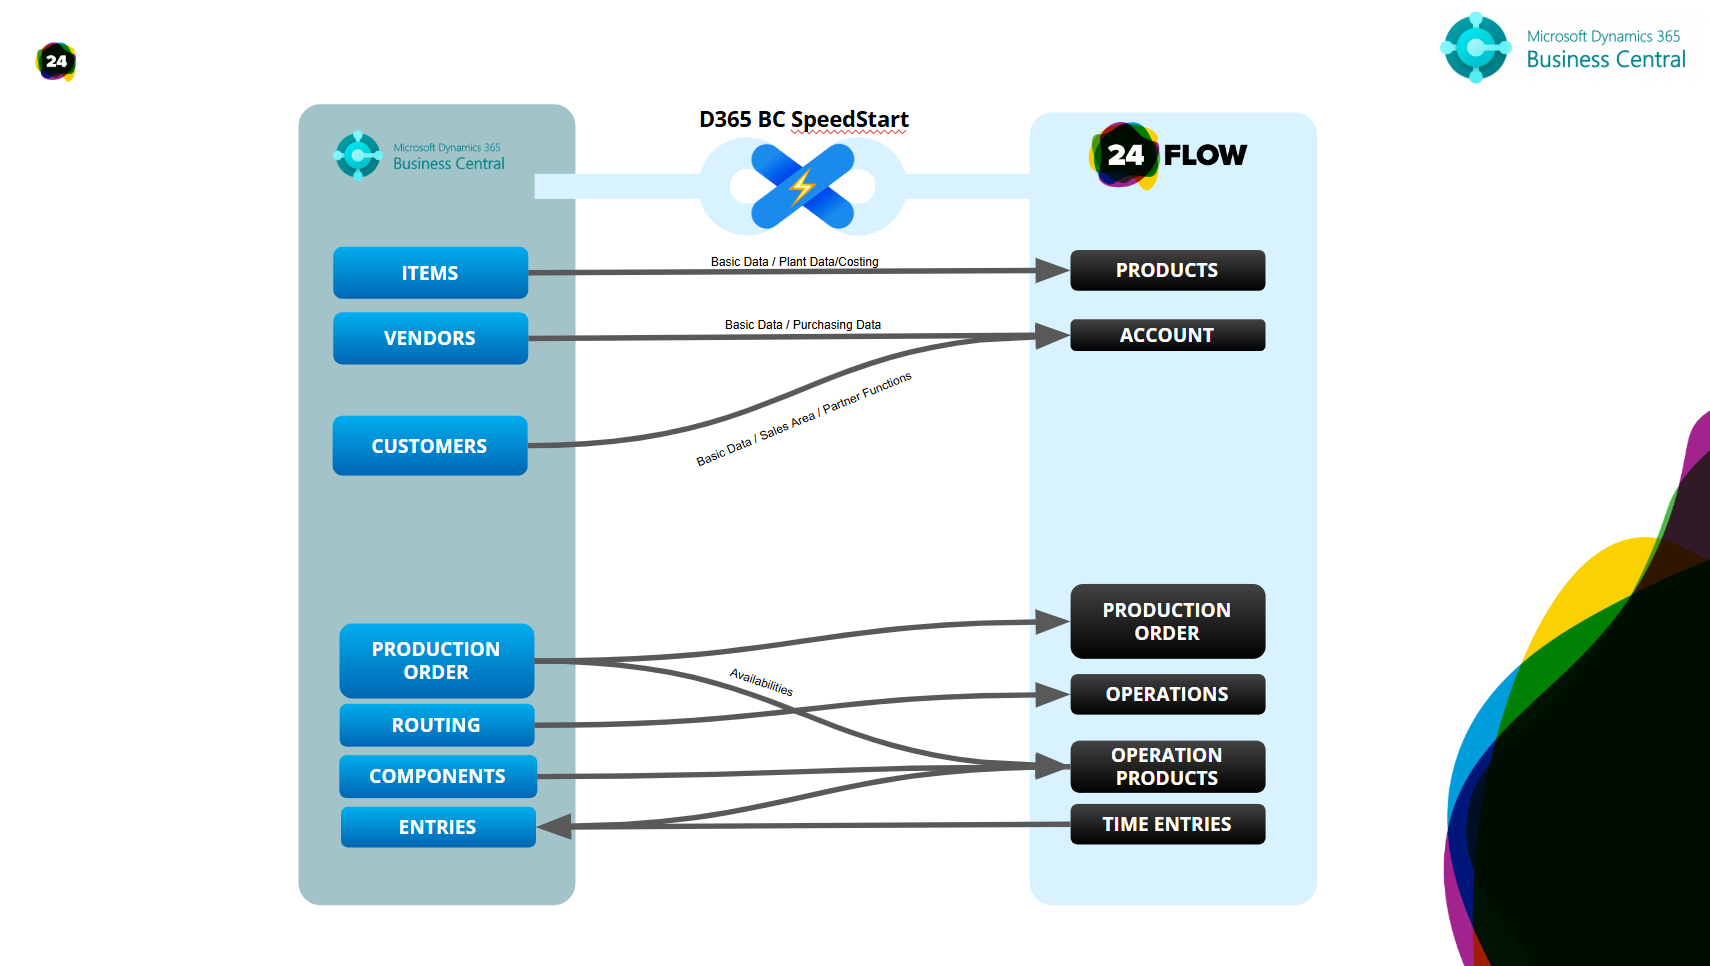
24Flow maintains a set of ‘off-the-shelf’ connectors to popular ERP systems. These connectors provide a head start and reduce the amount of configuration effort and lead time required to ingest ERP data into 24Flow.
In this summer '26 release, we have consolidated our earlier Business Central integration efforts in a new connector.
MCP Server
Built on the Salesforce platform, 24Flow offers its customers a secure & scalable platform to host composable apps in a low-code environment.
With the advent of AI technology, Salesforce has extended its platform capabilities to interact with third-party LLM services via MCP (Model Context Protocol). MCP enables seamless integration between LLM-based applications and external data sources such as 24Flow. It provides a standardized way for LLM applications to discover and access contextual information, tools and capabilities that can be used with LLM “function-calling” features.
In the context of 24Flow, the Salesforce Model Context Protocol (MCP) bridges the gap between your 24Flow environment and third-party AI assistants like Claude, ChatGPT, or Cursor. It acts as a universal, secure connector that allows LLMs to query data, run SOQL, or trigger business logic—all while strictly enforcing your existing Salesforce user permissions and OAuth governance.
Salesforce provides built-in, generally available MCP servers that act as managed endpoints. You don’t need to build custom APIs; you simply configure the integration using standard OAuth 2.0 and let your users work directly in external chat tools like Claude Desktop.
Time Warp
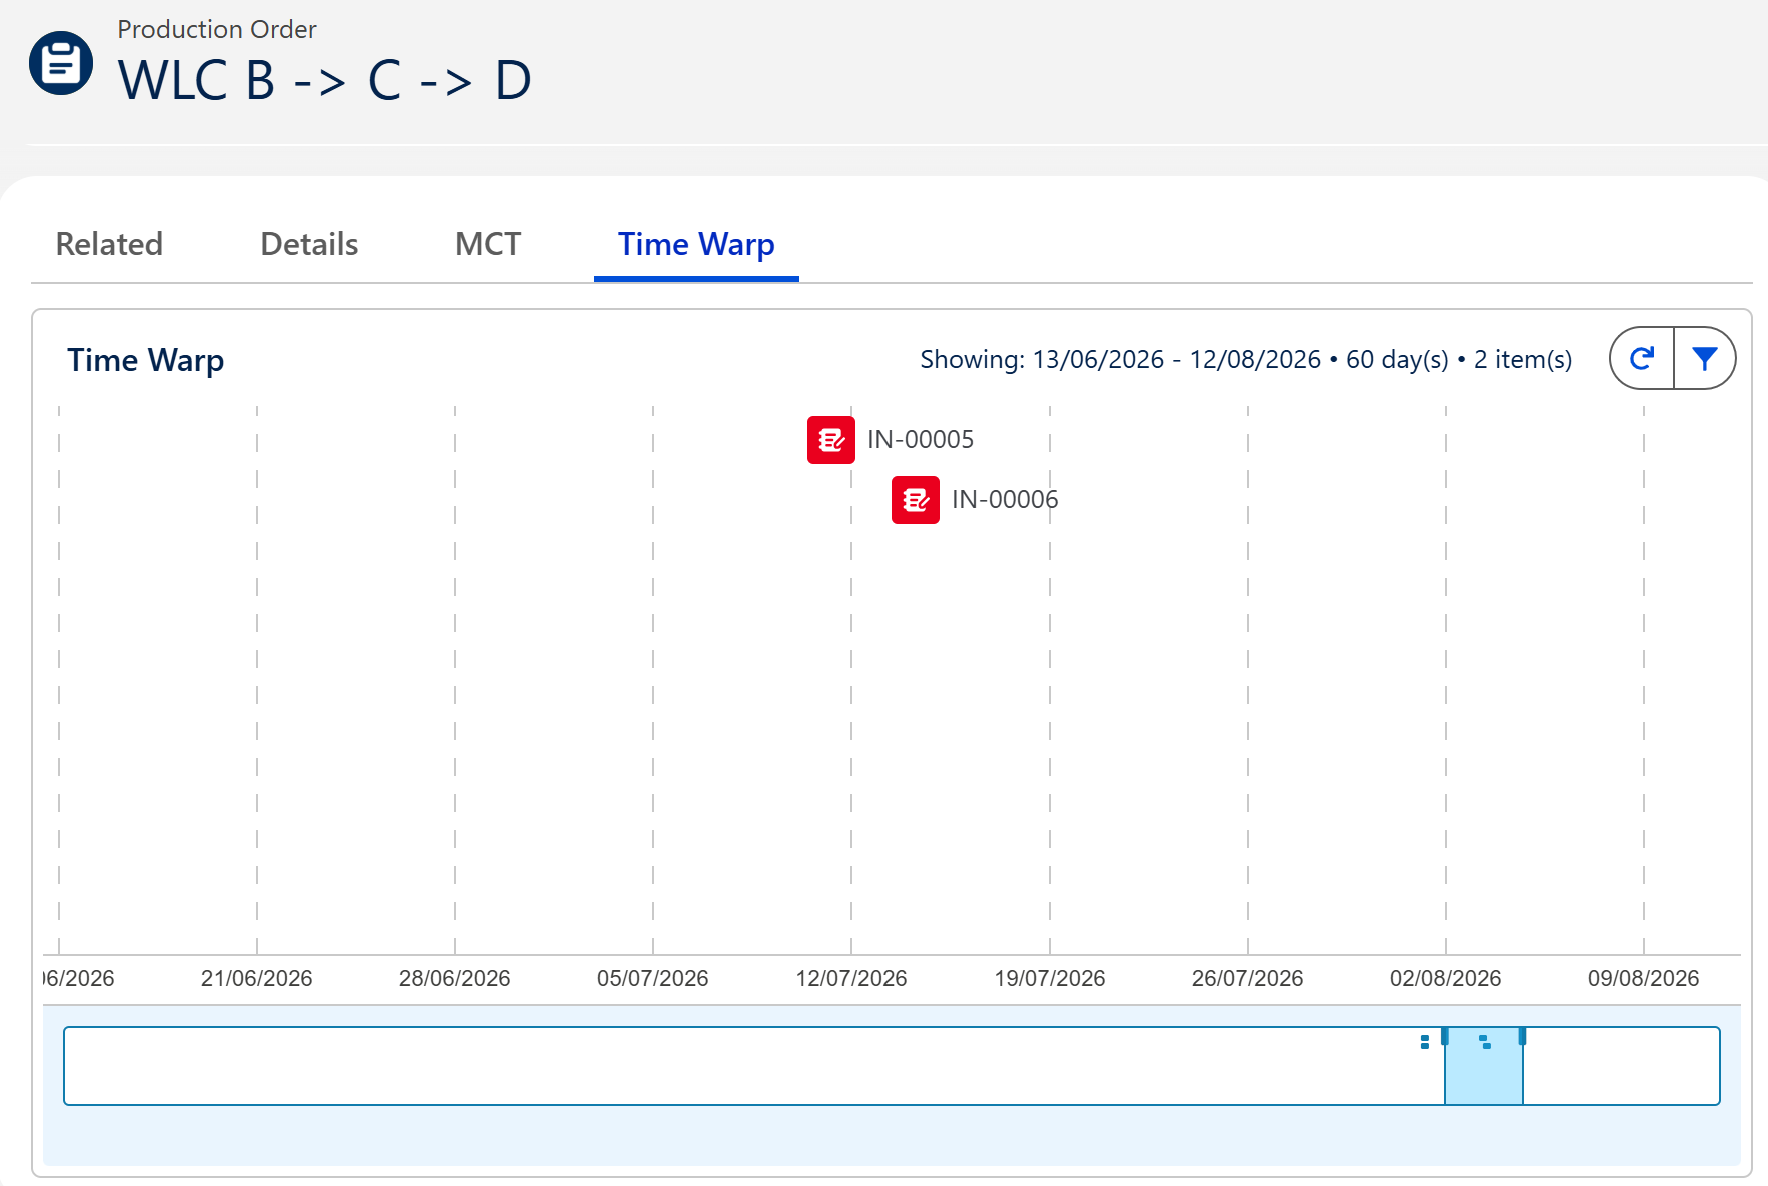
Time Warp is a nice component that allows you to visualize events on a timeline. As an example you can use Time Warp to visualize incidents or other events logged on a production order on a timeline.
Read more on Time Warp here.
Team Cockpit Enhancements
-
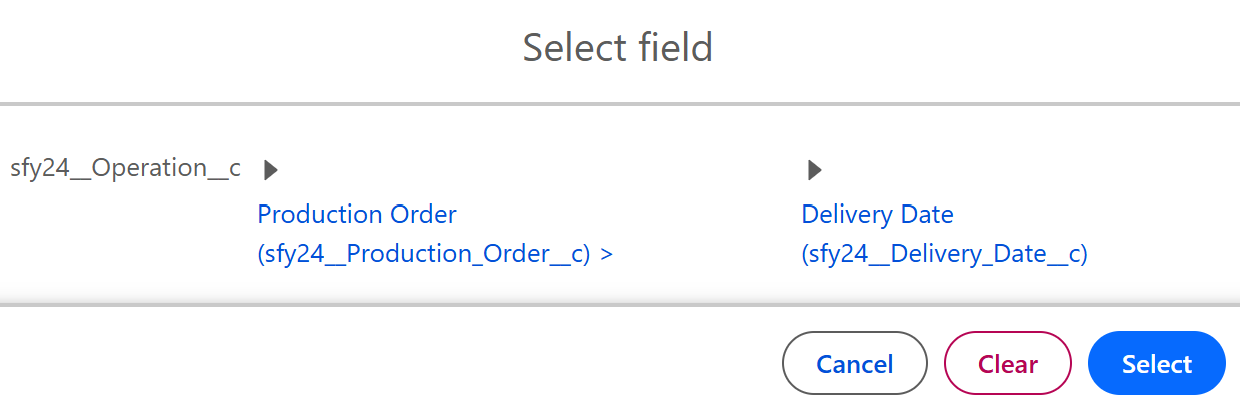
Use Look-up Fields in Team Cockpit Settings Fields: In the example below, we can select the delivery date from the production order for a specific operation, and show it as a column in the Team Cockpit.
-
Select multiple operations: Select multiple operations (in the same state) to e.g. release multiple operations in one go.
-
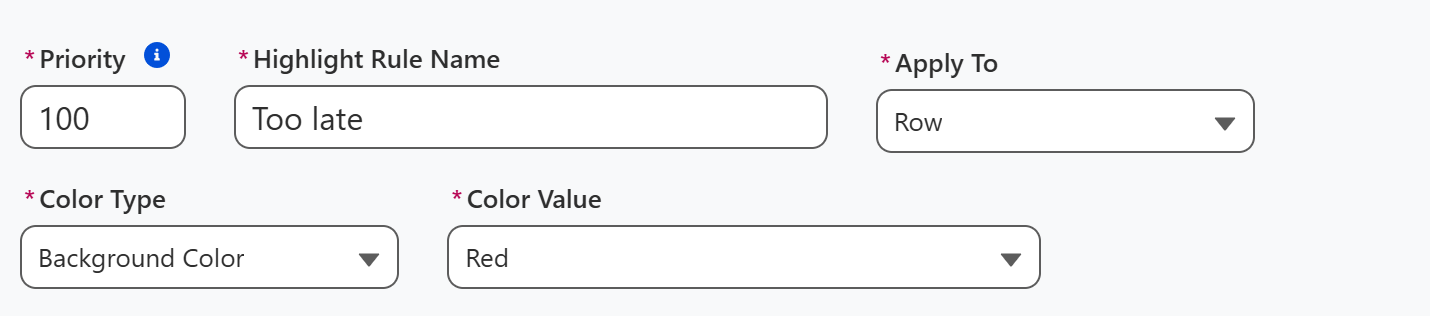
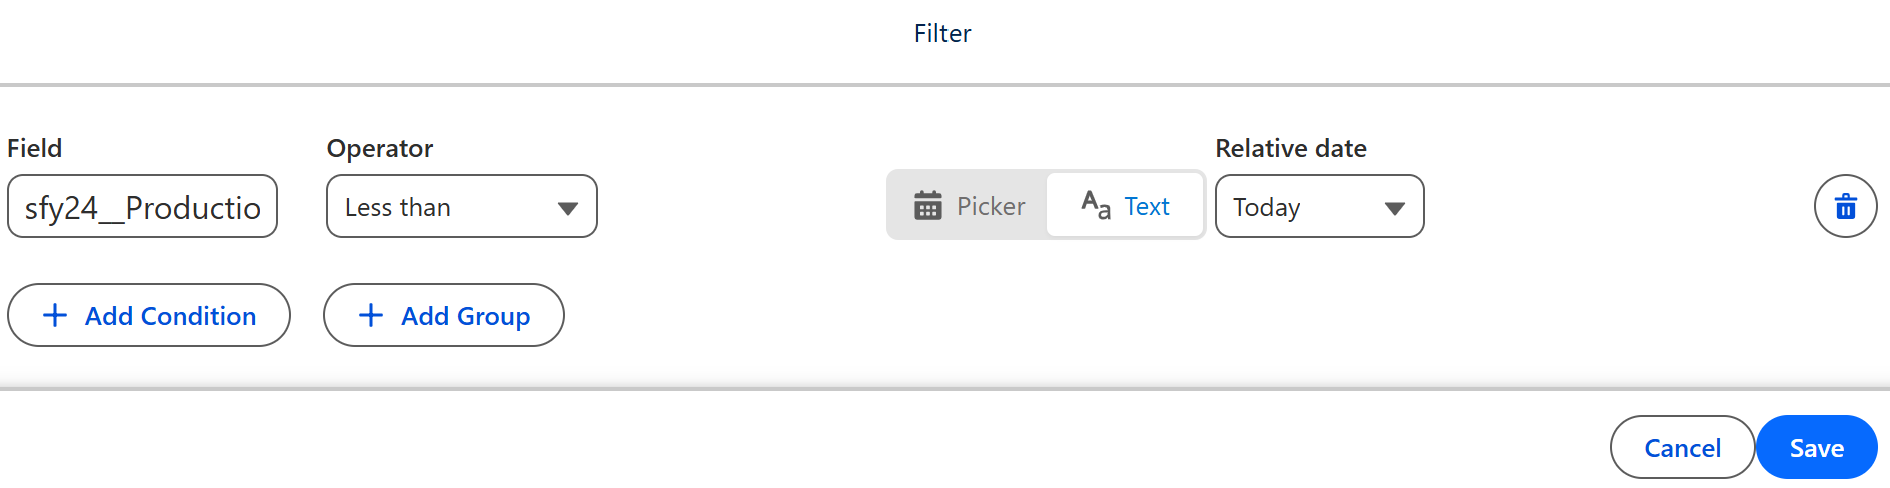
Highlight rules with relative filters: E.g. color all orders with a delivery date earlier than today in red. Read more here.
-
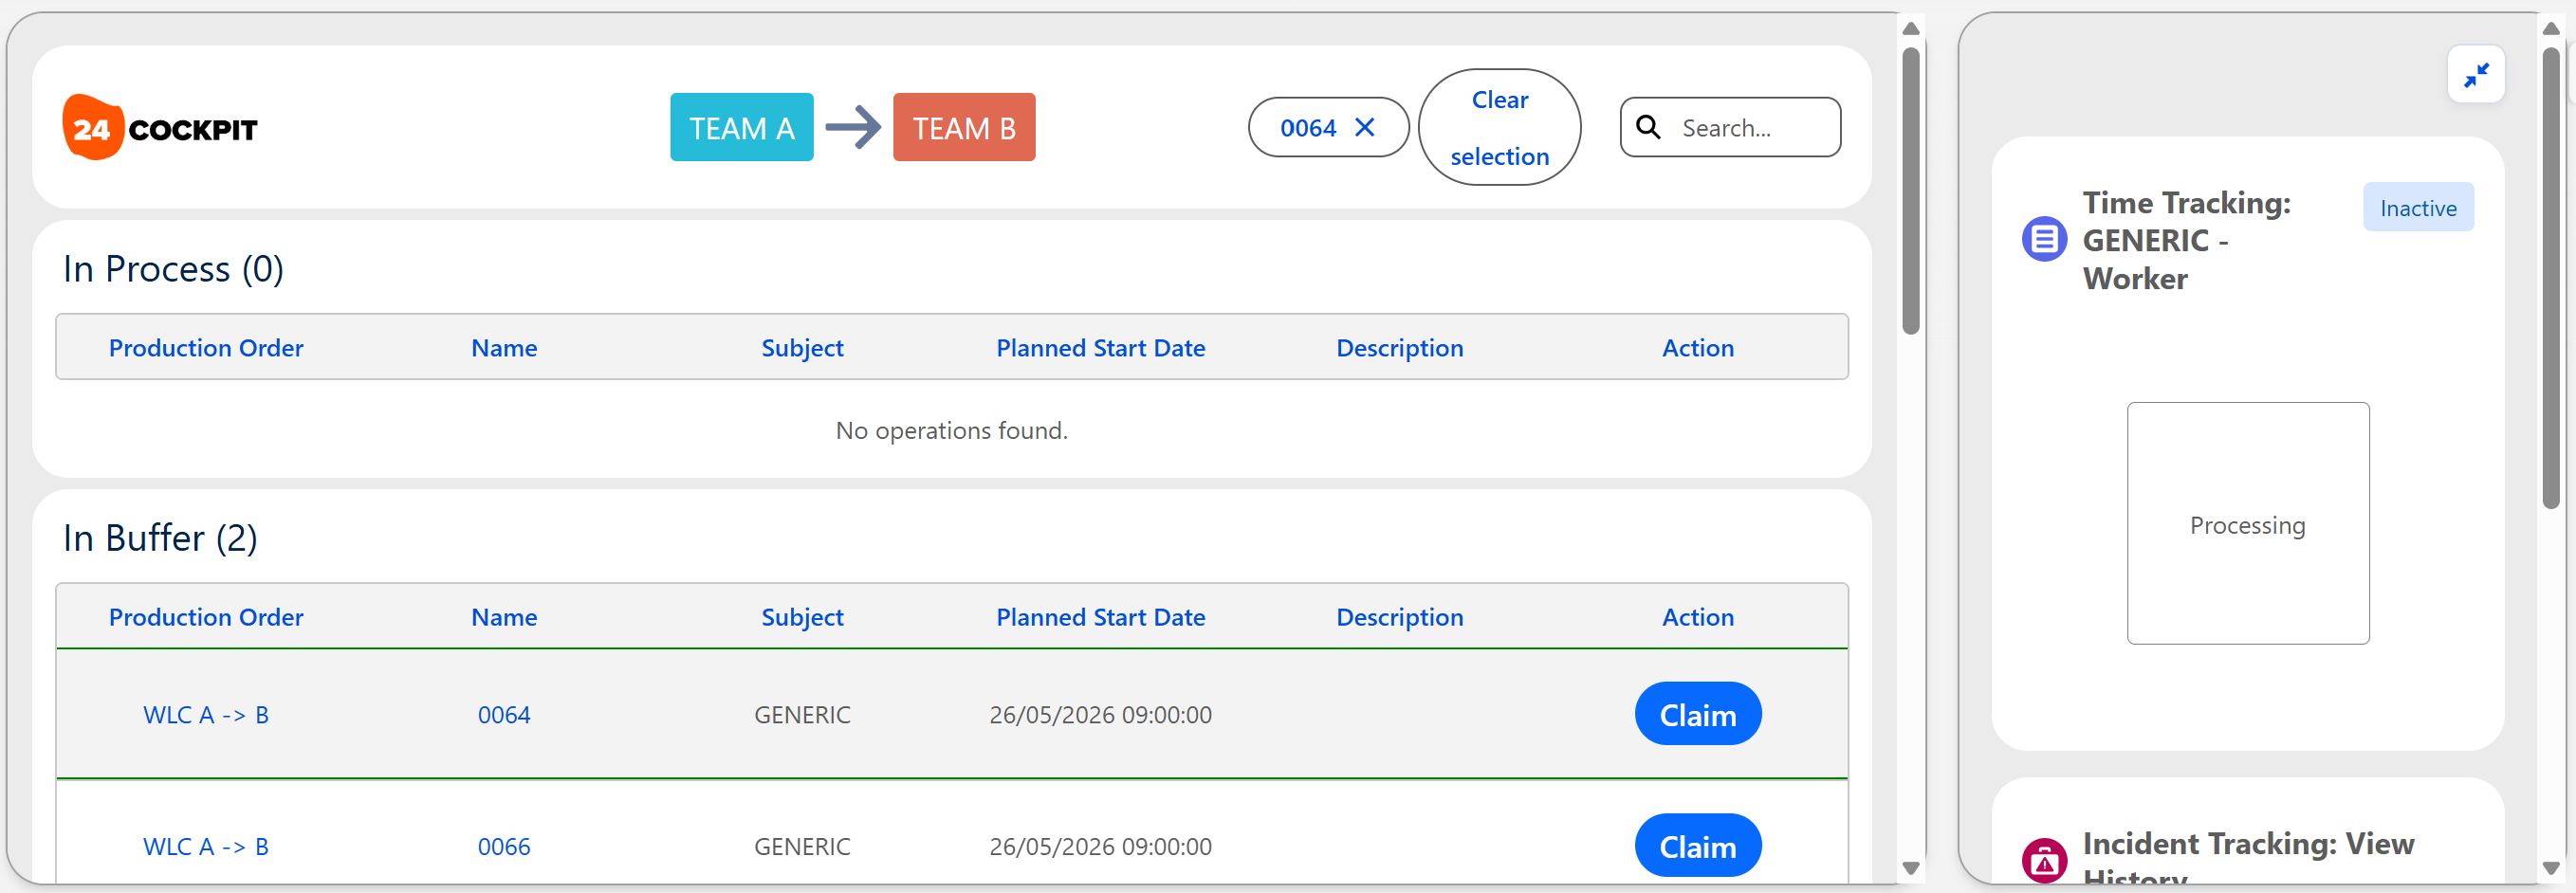
Mobile Team Cockpit: A specific Page Layout with a collapsible right pane is now available for running Team Cockpit on tablets. Read more here.
-
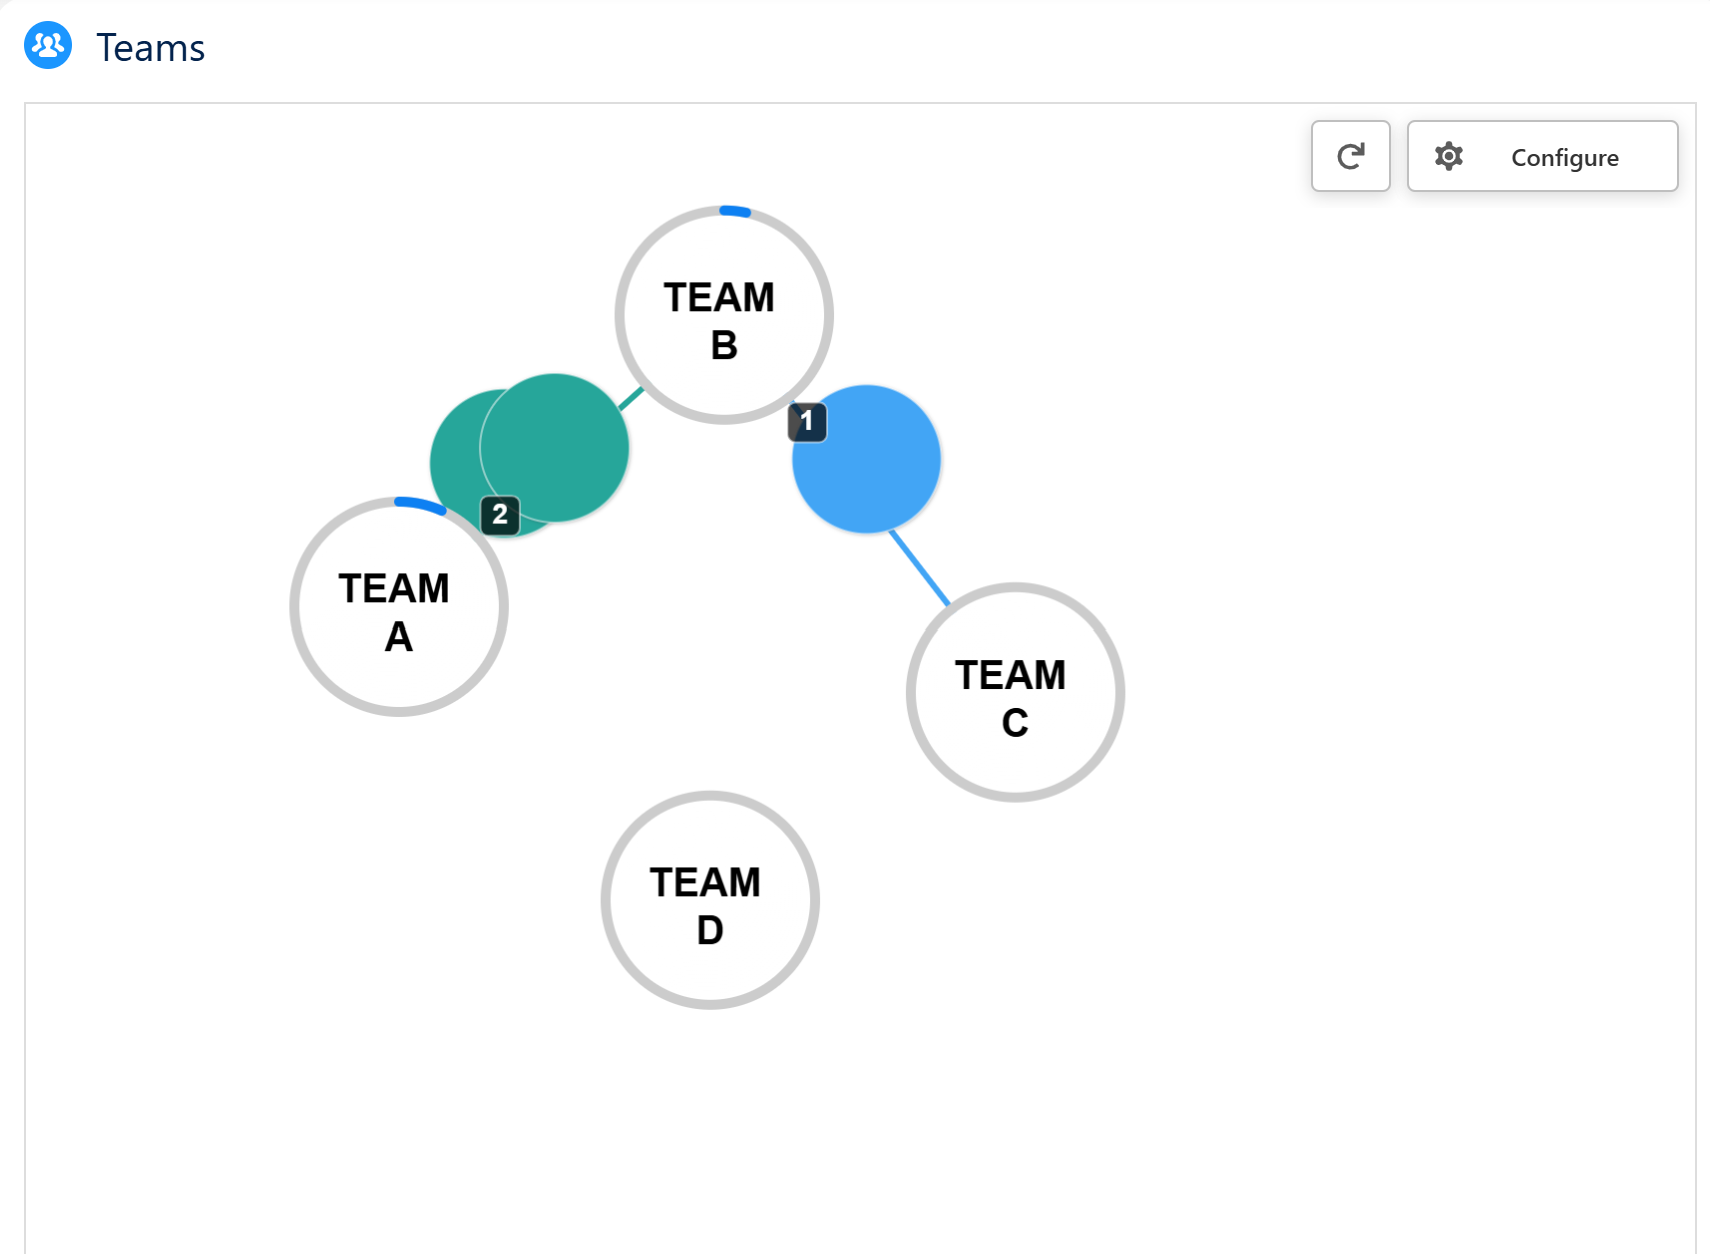
Beta - Work Distribution Chart: We have created a new (animated) visualization of how the work flows between teams. This component can be added to the Order Pool, Team Cockpit or general dashboard pages.
24Planning
Planning Board Usability Improvements
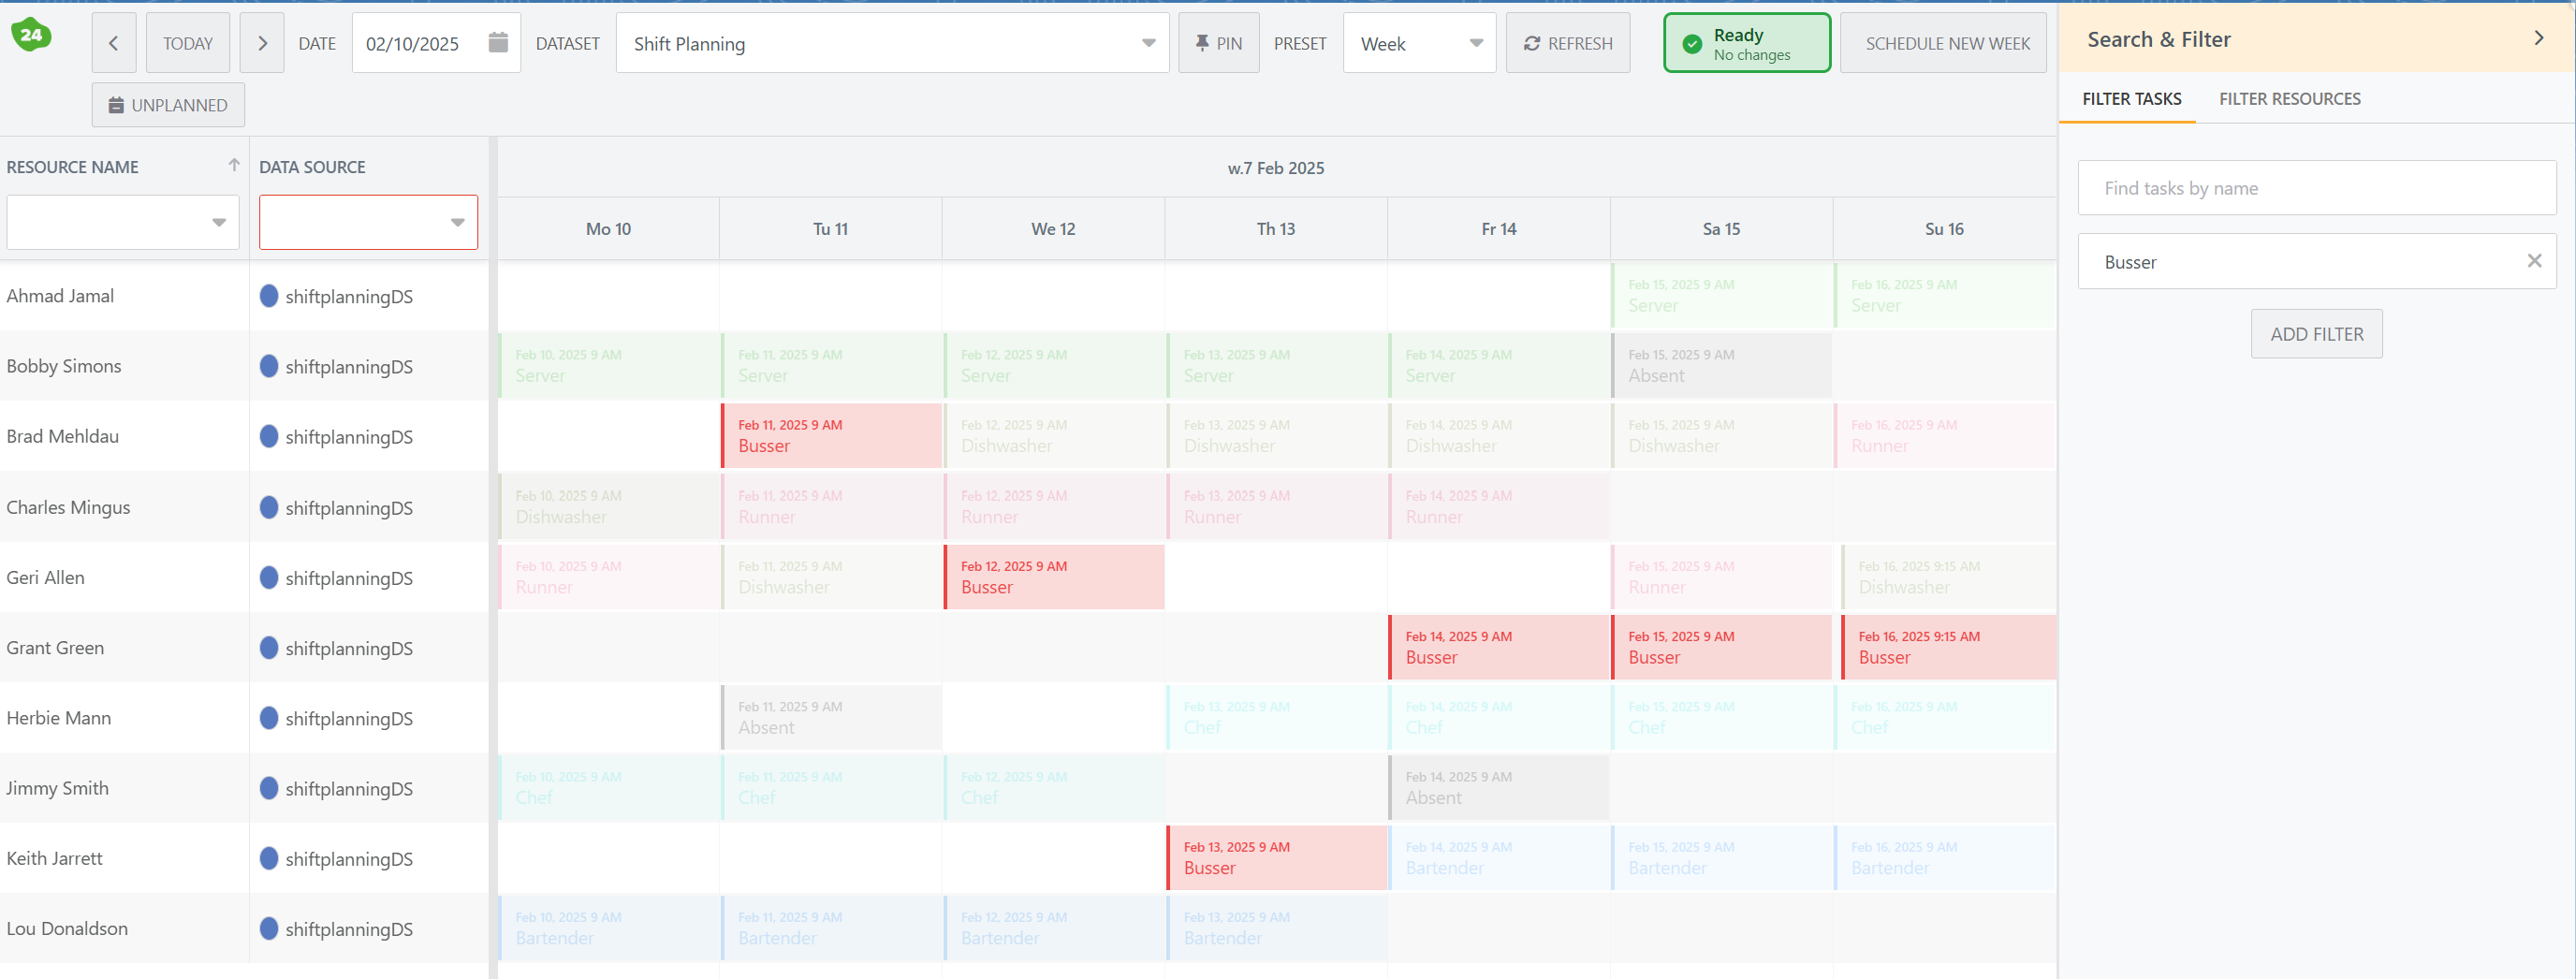
On the righthand side of the planning board, there is a new ‘Search and Filter’ side bar that allows you to search, filter or highlight events and resources. The screenshot below shows the highlight events in action.
In addition, we have added a number of dataset and datasource configuration options to:
-
Change the default row height: In case you have a lot of resources and want a denser layout, you can decrease the row height.
-
Hide the default right-click actions: If your users do not need to edit, view or delete events, you can hide these from the event menu options.
-
New event start and end-date: These start and end-dates are now automatically based on either the workschedule or the Start and End Hour configured in the dataset. The latter in used in case there is no workschedule defined for that specific resource.
Configure which Datasources to Show by Default
A dataset can comprise multiple datasources, and in some cases you may not want to view all of them by default.
In order to provide some flexibility, there is a new checkbox parameter on the Dataset Datasource object, named Default Selected, that allows you to configure which Datasources will be shown when first opening the dataset.
If you are upgrading from an older 24Planning release, navigate to Setup>Object Manager and search for Dataset Datasource. Navigate to Page layouts, and add the field Default Selected.
24Planning Performance Improvements
In the summer release, we have implemented many performance improvements, especially w.r.t. the initial loading time of dataset with a large number of resources and events.
To benchmark the improvements, we have compared the performance of the summer release to that of the spring release. We obtained a 10-20% performance improvement in the initial load time of resources and events for use cases with 1,000 to 5,000 events.
These tests were conducted with 10-300 resources and in all test scenarios there were 10 dynamic fields per event.
Sequencing Component
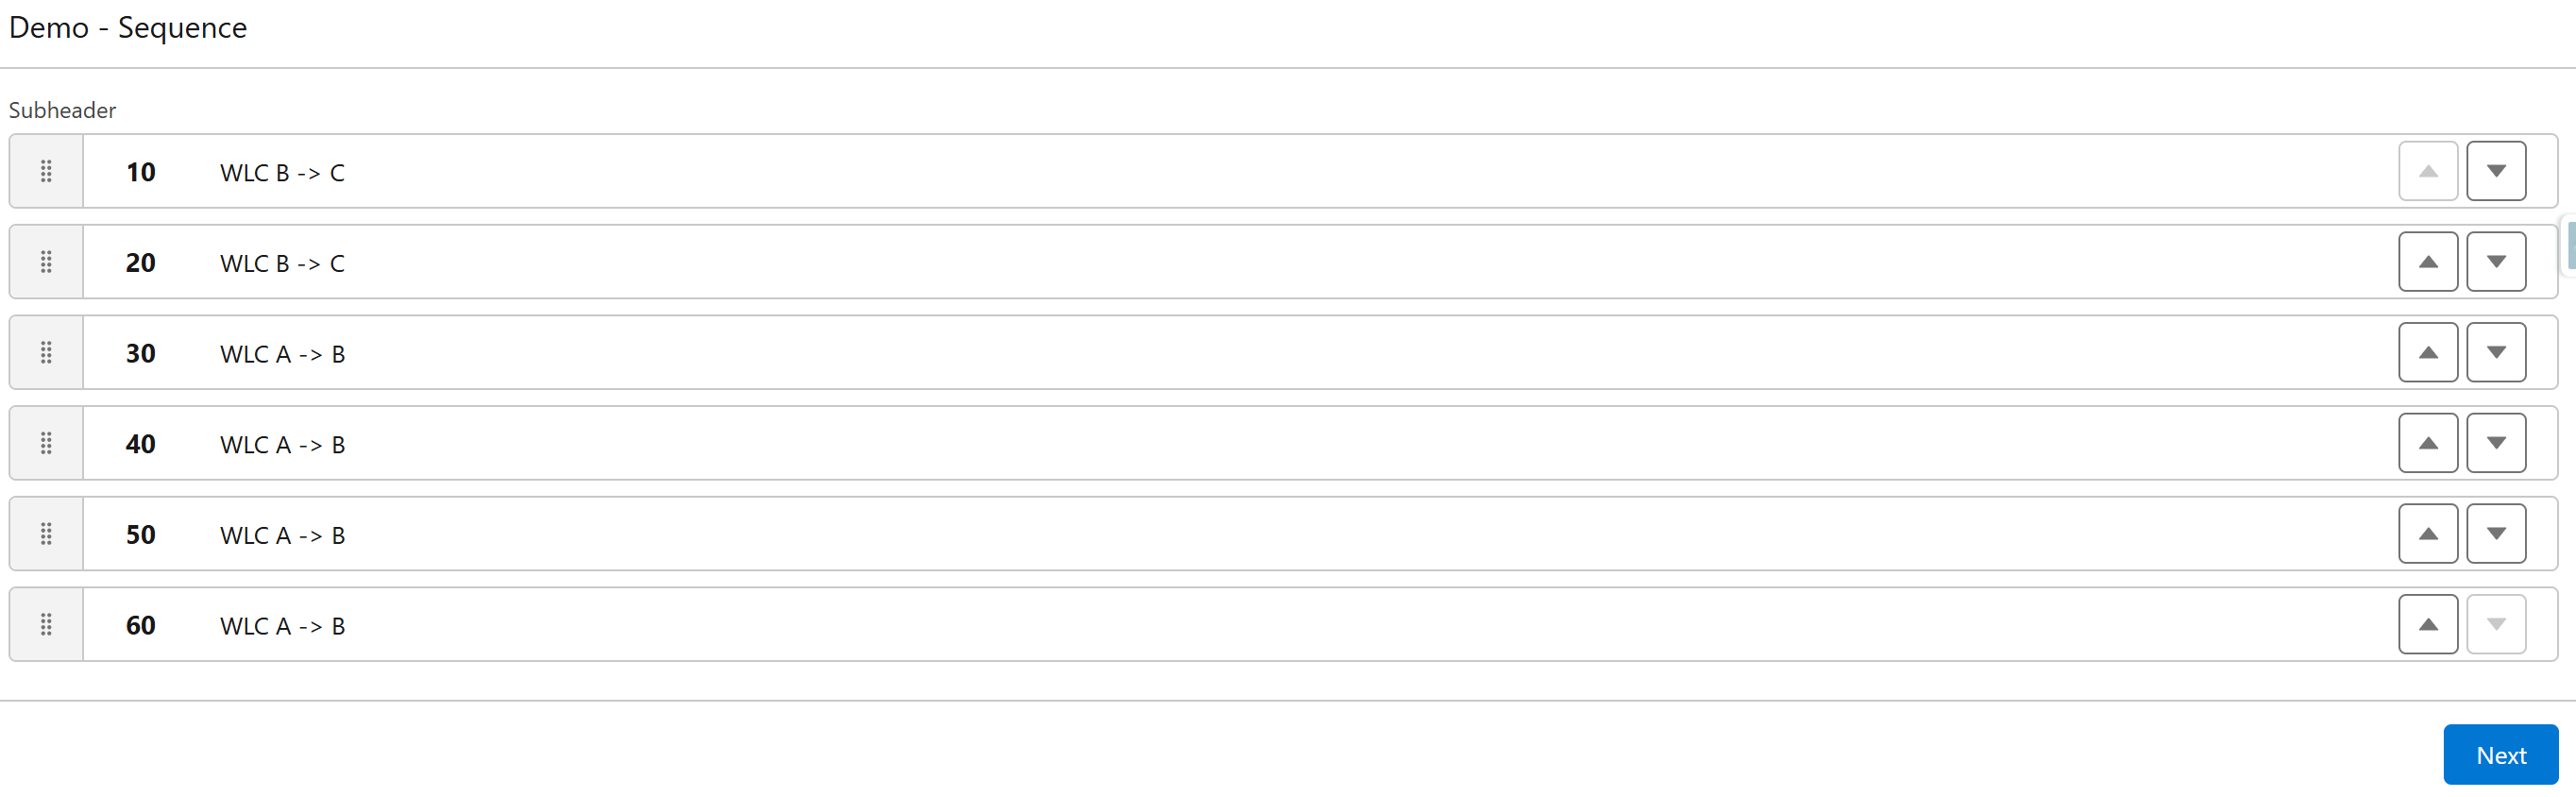
Assume you have done your production planning using 24Planning, but you would still like to optimize the sequence of orders on a particular machine within a time window of say one or two week, e.g. to reduce setup times.
The Sequencing Component allows you to do this in a more convenient way than via drag-and-drop in the Planner. Whenever you save you results, the new sequence of events is instantly reflected in the planning board as in the background, we calculate the new start- and end-time for the underlying operations.
24Checklist
Working With Multiple Checklists
You may have multiple checklists for the same record page: either multiple instances of the same checklist or just different checklists for the same record.
The new summer release comes with some great new functionality for these use cases:
-
Multiple instances of the same checklist can be created either by the user (new button) or programmatically via a Flow, e.g. for periodic checklist. Moreover, it is possible to add filter criteria, such that users e.g. only see checklists that have not yet been completed.
-
Multiple checklists can either be shown as separate components, or can be shown within a single component.
This video demoes these new capabilities.
More Compact Layout
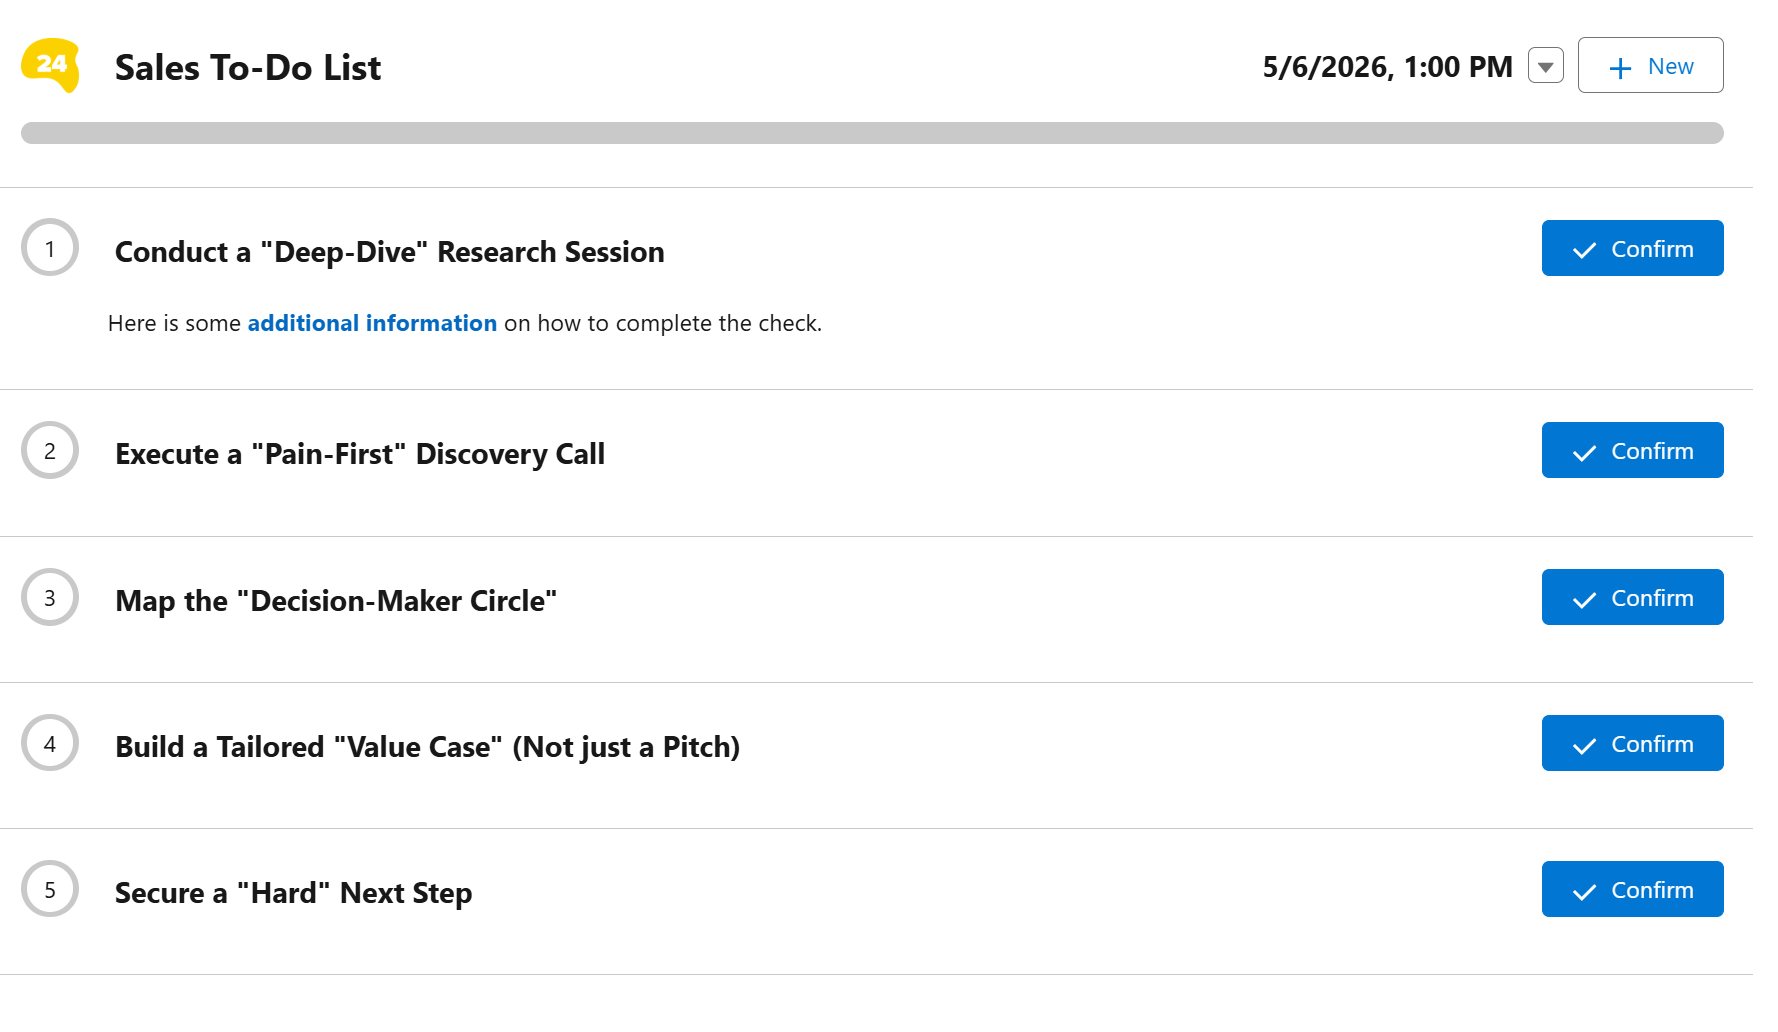
We have updated the layout of checklist such that they are much more compact. In addition, we now support different sizes of the YES/NO button. So less scrolling and a more compact design for e.g. To-Do Lists.
Using Checklists In Salesforce Reports
Many customers use Salesforce Reports to report on Checklist Results. You may want to combine records from Checklist Results with those of the relates Objects such as Cases or Opportunities.
This video shows you how to best make use of this capability.
We All Make Mistakes
When you made an error when confirming a check, there was no straightforward way to correct it. An admin had to remove the corresponding Check Result. Now, it is possible to display an Undo button on the checklist itself. The Undo button is controlled by a permission set, in case you only want certain users to use this capability.
Add A Comment To A Check
24Checklist already allowed to upload pictures or add a file to check, but now users can also add comments.
Do Not Lose Your Checklist Results
In the past, when you refreshed the record page, all unconfirmed Check Results were lost. This is no longer the case.
24Files
Work Without A Public Folder
This is a feature that has been requested by many customers ‘Can we remove the Public Folder?’. Actually, this is possible as of the summer release '26, provided of course that you do not use Anonymous Access.
As a brief reminder: the Public Folder (and its subfolders) are the only folders accessible to users that have access to 24Files in Anonymous Access mode. Anonymous Access is primarily used on Experience Cloud, where external users without a SharePoint account, can still upload documents to SharePoint via a shared service account. In case your setup does not make use of Anonymous Access, you no longer need a Public Folder in your folder structure.
In the Folder Structure tab in the 24Files Manager app, there is a new option Disable Public Folder for that specific folder structure.
If you are upgrading from an older 24Files release, and do not see this checkbox, please navigate to Setup > Object Manager. Search for 24Files Folder Structure. Navigate to Page Layout and add the Disable Public Folder checkbox to the page layout.
Please note that 24Files does not remove any folders or files from SharePoint, so disabling the Public Folder will not have any effect on existing records.
Existing folder structures will not change when upgrading, i.e. the checkbox is unchecked by default.
Edit Metadata
24Files already allowed users to define metadata at the time of file upload. Now, users can also edit metadata for files.
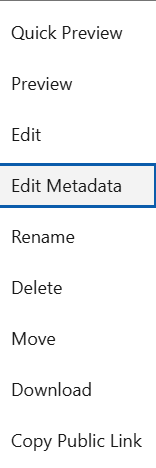
In order to enable this capability for your users, make sure you checked the Enable Edit Metadata checkbox in the 24Files Component settings (Custom Metadata Types).
SharePoint Metadata & Object Configuration
Some customers had accidently added read-only metadata fields in the Fields to edit section of the object configuration. In order to prevent this, we have applied filtering such that only editable SharePoint metadata fields can be selected.
SharePoint Metadata For Dynamic SharePoint Sites
This summer release adds support for viewing and editing SharePoint metadata when using Dynamic SharePoint Sites. Because the site or library can change at runtime, 24Files needs a fixed reference to discover which metadata fields are available.
If you use Dynamic Metadata in combination with Dynamic SharePoint sites, please verify that the fields that you select under ‘Fields to display’ and ‘Fields to edit’ exist across all your Dynamic SharePoint Sites, else you will get errors.
Enable The Lightning Design System 2 (SLDS 2) Theme
For the best admin and user experience, we recommend that you enable the SLDS 2 theme on your environment, via Setup > Themes and Branding.