Why Multi-Factor Authentication (MFA)
As the security landscape evolves and threats that compromise user credentials grow more common, it’s important to implement strong security measures to protect your business and customers. Multi-factor authentication is one of the easiest & most effective ways to help prevent unauthorized account access and safeguard your data!
Usernames and passwords alone don’t provide sufficient safeguards against unauthorized account access. Multi-factor authentication (MFA) adds an extra layer of protection against threats like phishing attacks, credential stuffing, and account takeovers.
How to set up MFA in 24Flow for Web
Here is a step-by-step guide on how to setup MFA.
You can enable MFA in 2 different ways:
-
Setup
-
Setup > Identity Verification > 'require multi-factor'
-
You can configure MFA in 2 different ways:
-
Via Profiles.
-
Via Permission Sets.
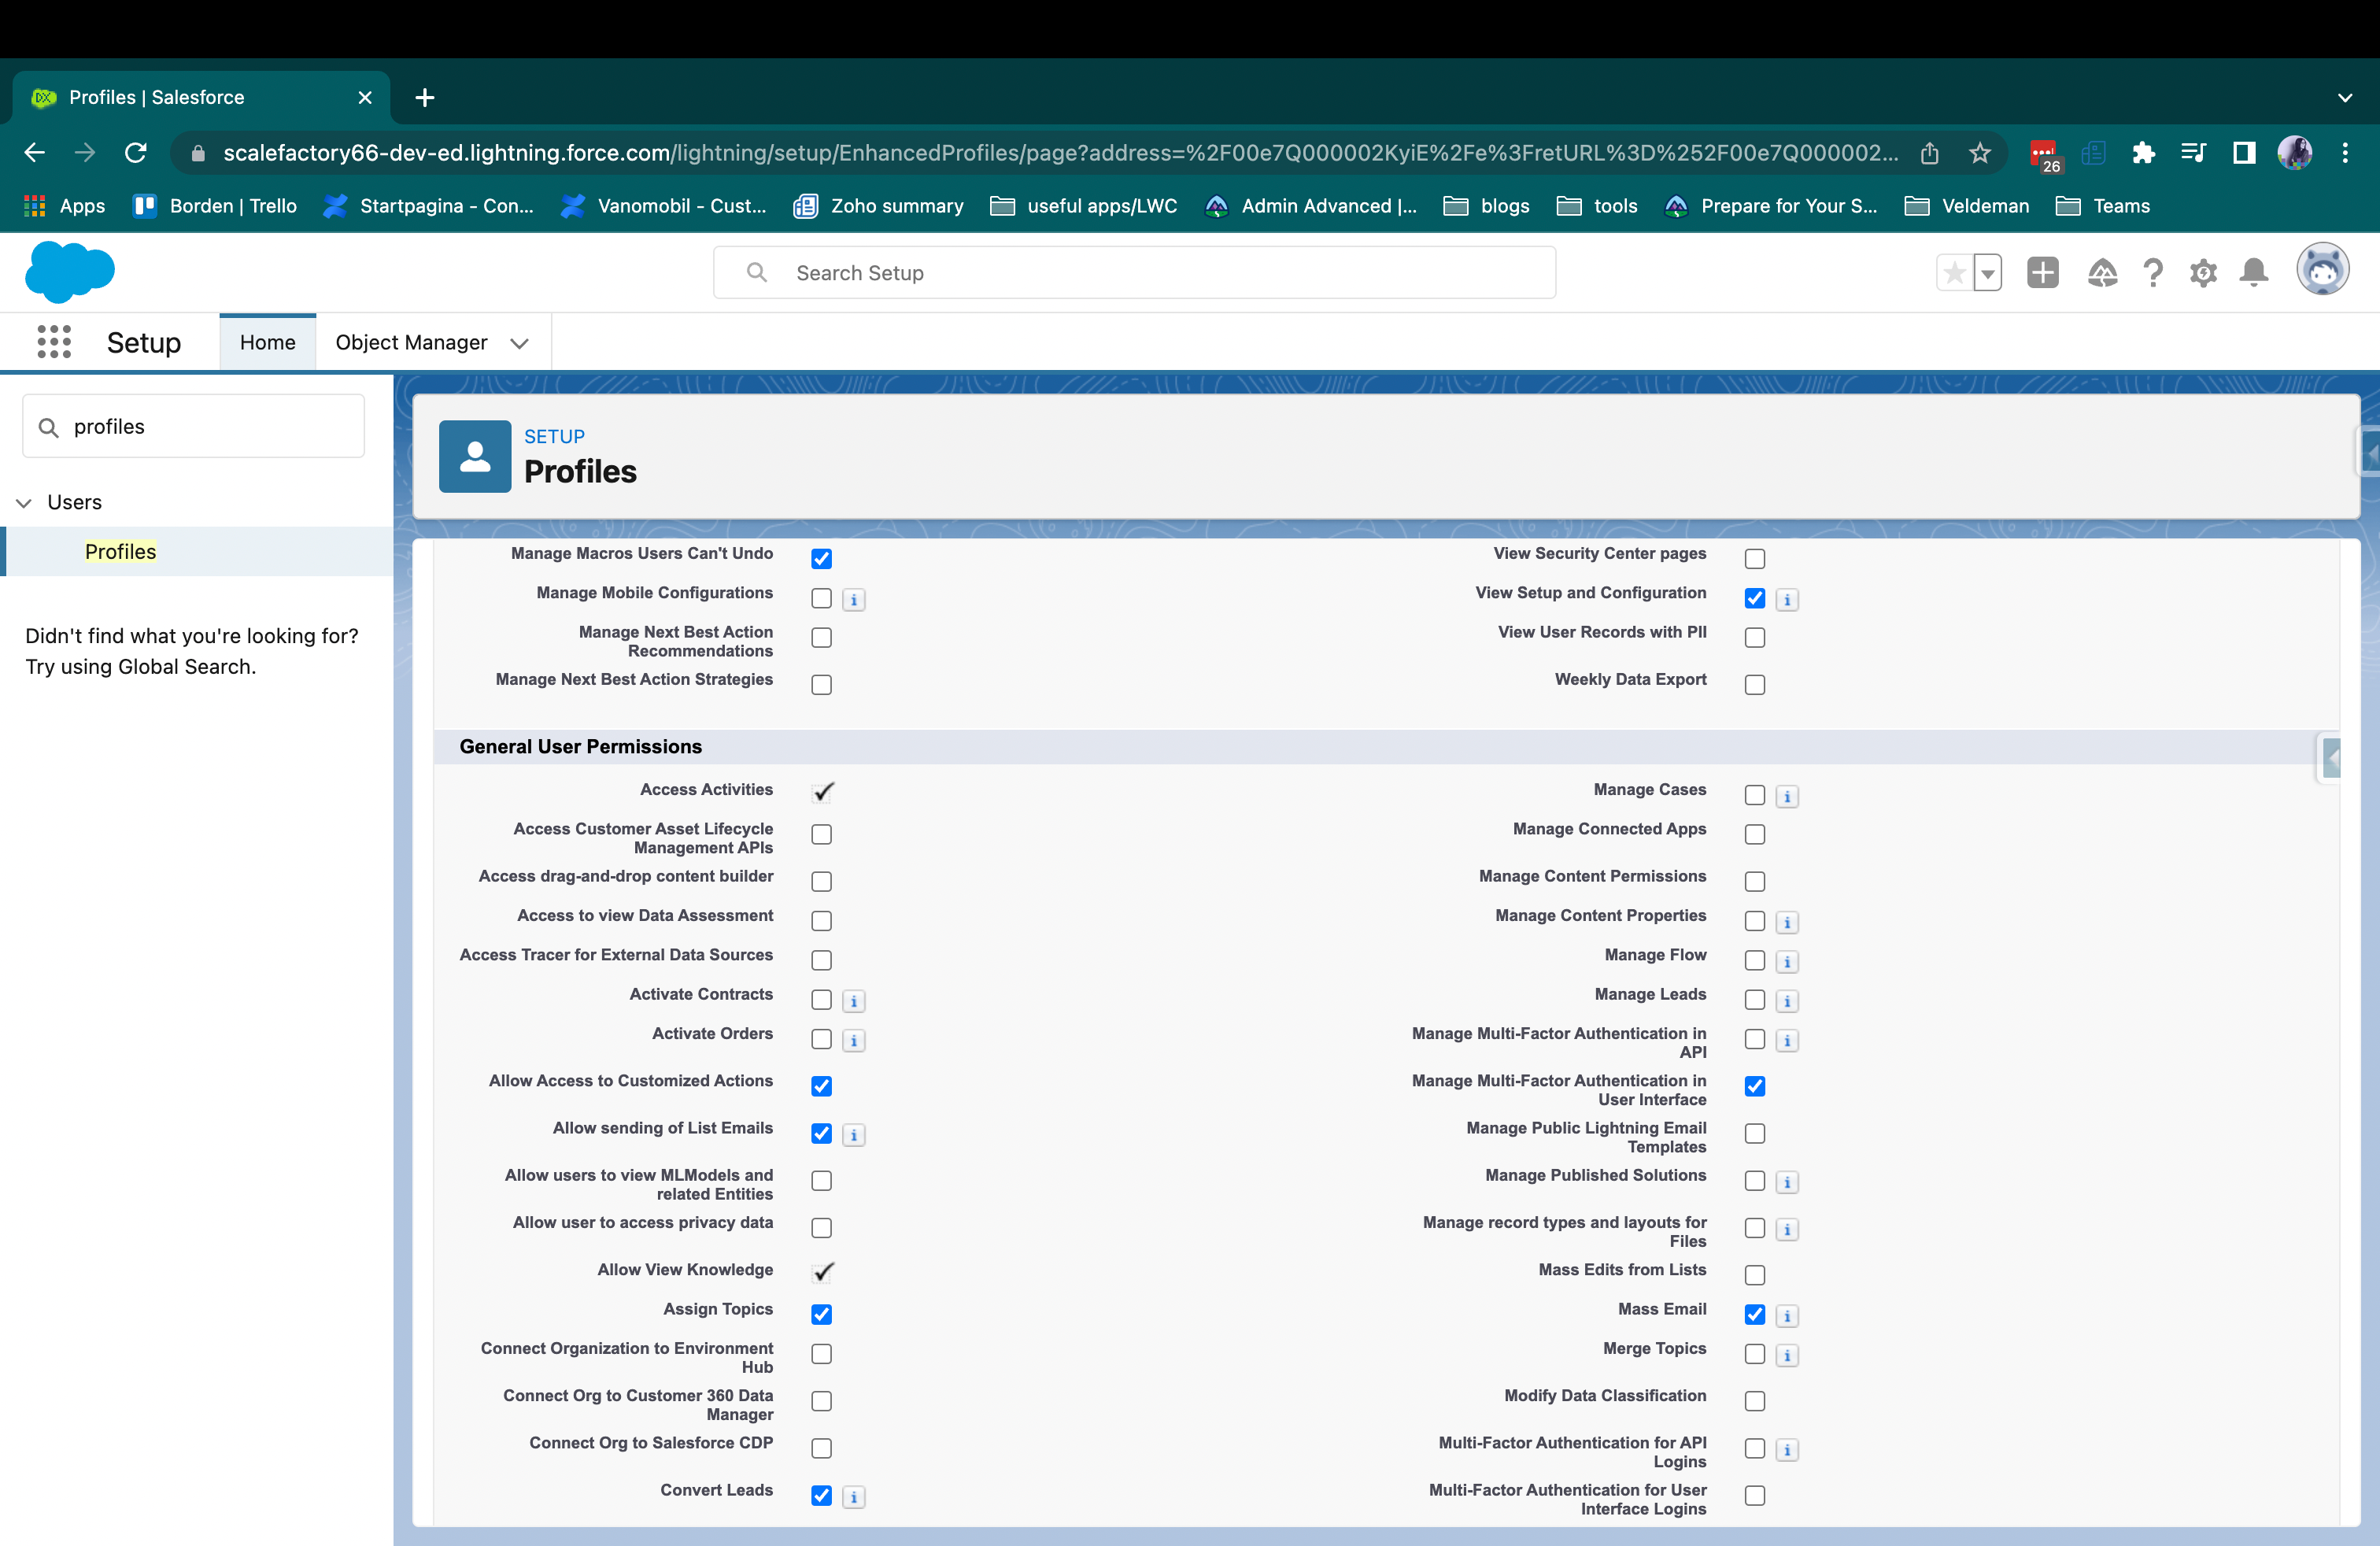
Profile Settings
If you configure MFA via Profiles, all users with that profile will be required to use MFA.
-
Navigate to the particular profile.
-
Click edit.
-
Check the “Manage Multi-Factor Authentication in User Interface” in the General User Permissions.
-
Save.
Permission Sets
If you configure MFA via Permission Sets, you can manage which users get MFA and develop a rollout strategy:
-
In Setup, navigate to Permission Sets.
-
Click new.
-
Give the permission set a name and description.
-
Click on System Permission.
-
Click on edit.
-
Check the “Manage Multi-Factor Authentication in User Interface logins” in the General User Permissions.
-
Save.
-
On the pop up, click save.
-
Click Manage assignments.
-
Click Add assignments.
-
Choose the users you need and save.
How to set up MFA in 24Flow for Mobile App - iOS & Android
Steps in Lightning Experience:
-
Navigate to Setup | Apps | Connected Apps | Manage Connected Apps | Salesforce for iOS / Android.
-
Click Edit.
-
In the 'OAuth Policies' section, set the IP Relaxation setting to Relax IP restrictions for Activated Devices.
-
In the 'Session Policies' section, click the High assurance session required checkbox.
-
Click Save.
Note: You will need to repeat these steps in Salesforce for Android as well.
Once these steps are completed, open the mobile app and log in. You will be prompted to verify your identity.
Phishing Resistant MFA
As of June 2026, Salesforce is enforcing phishing-resistant Multi-Factor Authentication (MFA) for all users with the System Administrator profile, Modify All Data, View All Data, Customize Application, or Author Apex permissions). This applies to direct UI logins and Single-Sign-On (SSO) logins, across both production and sandbox orgs.
Salesforce’s phishing-resistant MFA verification methods leverage WebAuthn-based Security Keys and Built-in Authenticators. Salesforce also refers to these methods as Passkeys. Salesforce recommends adopting passwordless login via passkeys for faster logins.
More info can found here.
.png?cb=510763bbd3ca535a67b167ce2723a0af)
Single Sign On (SSO) & MFA
Is it necessary to activate MFA both on the SSO provider and on 24Flow?
No. If MFA is enabled for your SSO identity provider, you don’t need to enable MFA for users who log in via SSO. But if you have admins or other privileged users who log in 24Flow directly, we recommend to set up Salesforce’s MFA for these users.
How to disable MFA in 24Flow
For which users can we disable MFA?
You can exclude MFA for certain users in certain cases.
For example for a trusted device from a trusted network or for system to system integrations.
Access Salesforce Setup
-
Log in to Salesforce with an administrator account.
-
Navigate to Setup: Click on the gear icon in the upper right corner and select 'Setup'.
Create a New Permission Set
-
Open Permission Sets: In the Quick Find box in Setup, type “Permission Sets” and select it under the 'Users' section.
-
Create New Permission Set: Click on ‘New’.
-
Label: Give the permission set a name, such as "Waive MFA".
-
API Name: This will be auto-filled based on the Label.
-
Description (optional): Add a description for clarity, like "Permission set to waive Multi-Factor Authentication requirements."
-
License: Choose “None” or the specific license type, depending on your organization’s setup.
-
-
Save the new permission set.
Add the "Waive Multi-Factor Authentication" Permission
-
Edit the Permission Set: After saving, you’ll be on the permission set's detail page.
-
Find System Permissions: Click on 'System Permissions' under the 'System' section.
-
Edit System Permissions: Click ‘Edit’.
-
Enable Waive MFA: Scroll to find “Waive Multi-Factor Authentication” and check the checkbox next to it.
-
Save your changes.
Assign the Permission Set to Users
-
Navigate to Users: Go back to the permission set detail page.
-
Manage Assignments: Click on ‘Manage Assignments’.
-
Add Assignments: Click on ‘Add Assignments’.
-
Select Users: Choose the users who need this permission set. You can select multiple users.
-
Assign: Click ‘Assign’ to give the selected users the waiver permission.
-
Done: Click ‘Done’ once you have assigned the permission set to all necessary users.
How can we disconnect a User’s Authenticator App
Besides Salesforce Authenticator, one other mobile authenticator app that generates verification codes (time-based one-time passwords) can be connected to a user’s account at a time. If your user loses access to the app by replacing or losing the mobile device, disconnect the app from your user’s account. The next time your user logs in with multi-factor authentication (MFA), if no other identity verification method is connected, Salesforce prompts the user to register a new method.
-
From Setup, enter Users in the Quick Find box, then select Users.
-
Click the user’s name.
-
On the user’s detail page, click Disconnect next to the App Registration: One-Time Password Authenticator field.
Note : Your users can disconnect the app from their own account too. In personal settings, they go to the Advanced User Details page and click Disconnect next to the App Registration: One-Time Password Authenticator field.
How can we “remember” trusted devices
You can use the Salesforce authenticator app to remember trusted devices.
Here you can download the https://www.salesforce.com/solutions/mobile/app-suite/security/ app
Salesforce will send a notification to the device when you try to login.
When you get the notification you have a choice (on the top of the screen) to automatically approve the sign-in request when requested from the same device & location for 60days.
More info : https://help.salesforce.com/s/articleView?id=000389323&language=en_US&type=1 & https://help.salesforce.com/s/articleView?id=sf.salesforce_authenticator_automate_trusted_requests.htm&type=5
Important Considerations
-
Security Implications: Waiving MFA can create security risks. Ensure you understand the implications and have a valid reason for doing this.
-
Compliance: Check if waiving MFA complies with your organization's security policies and any regulatory requirements.