
Configuring Order Pool
Order Pool
To add the Order Pool to your app in 24Flow, you first need to create a new page and your preferred Order Pool Settings. (see below for more info on how to create your Order Pool Settings)
To add a new page in 24Flow where you can incorporate your Order Pool Component, you can use the Lightning App Builder. This tool allows you to create custom pages for your 24Flow apps.
Here's a step-by-step guide to creating a new page and adding your Order Pool to it:
Step 1: Open the Lightning App Builder
Access the Lightning App Builder:
Navigate to Setup in Salesforce.
Enter "App Builder" in the Quick Find box and select Lightning App Builder.
Step 2: Create a New Page
Start a New Page:
In the Lightning App Builder, click on the New button to start creating a new page.
Select the Page Type: App Page
Click on App Page and then click Next.
Define the Page Details:
Provide a name for your new page, such as "Order Pool Page."
Choose the layout you want and click Next.
Step 3: Add Order Pool to the Page
Configure the Page Layout:
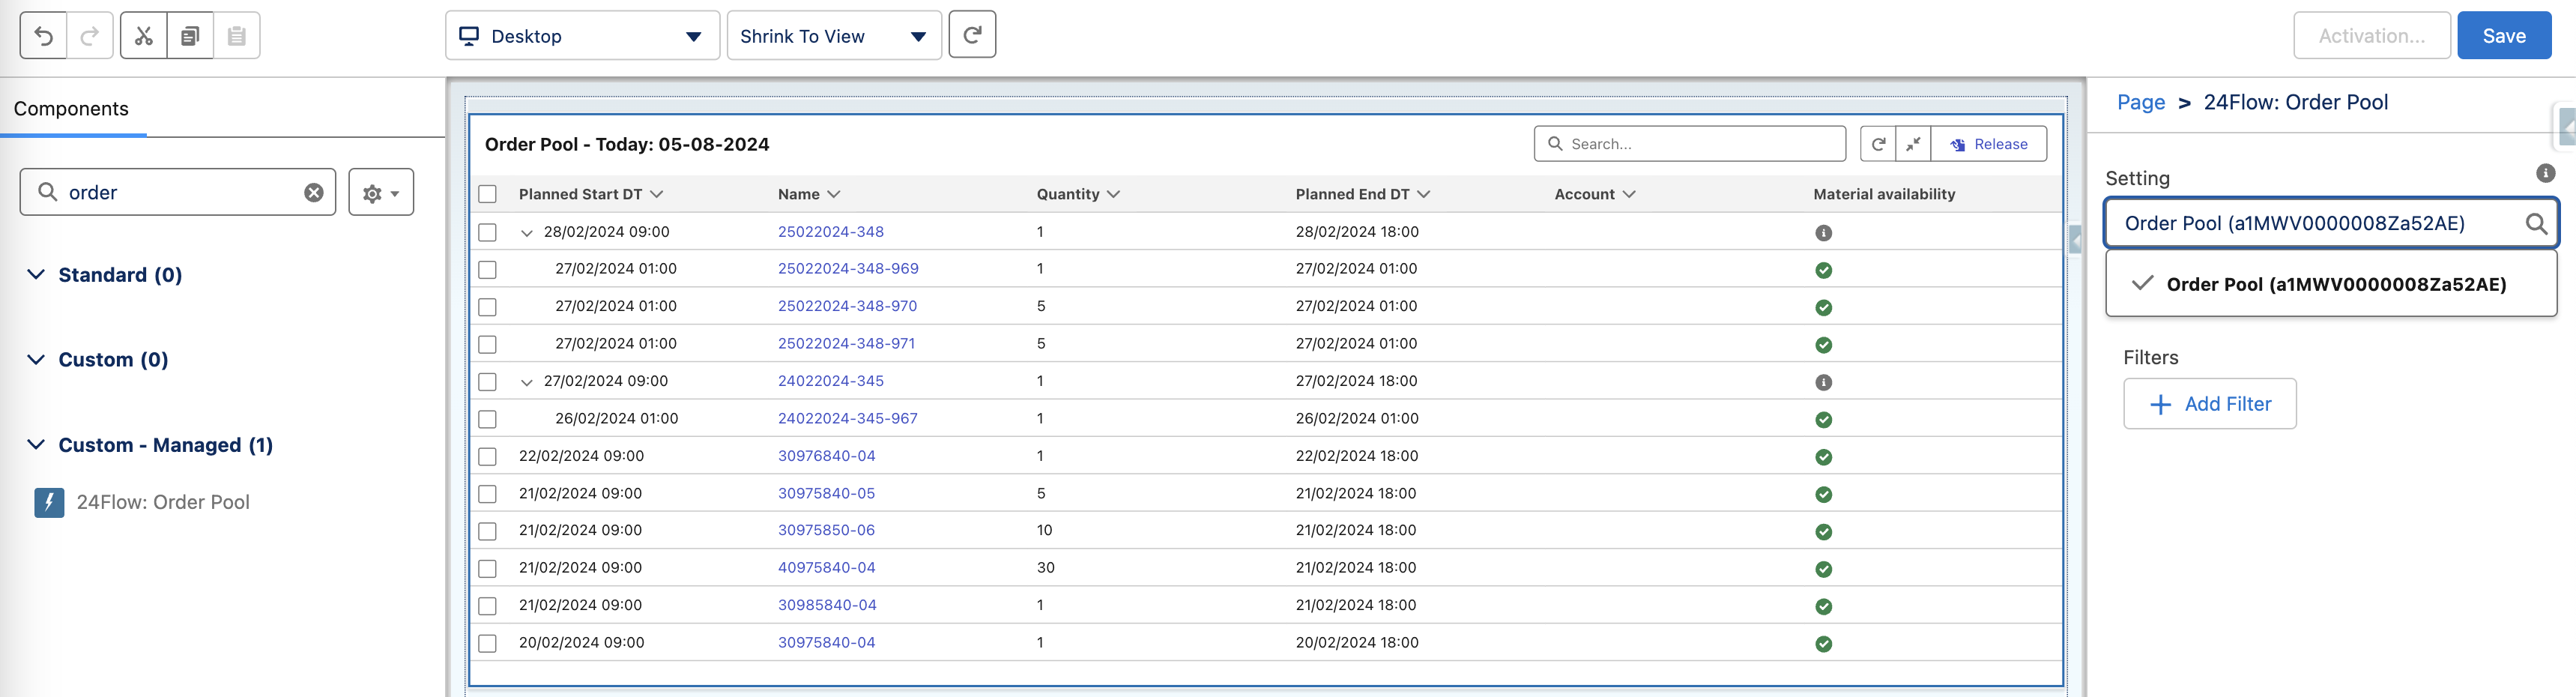
You'll now see a canvas area where you can drag and drop components. On the left side, there's a sidebar with different categories of components (Standard, Custom, and Third-party).
Find the Order Pool:
Scroll to the “Custom Managed“ category in the sidebar or search for Order Pool.
Drag the Order Pool component from the sidebar and drop it into the desired area on your page layout.
Step 4: Configure and Set Up Your Order Pool
Set Component Properties:
With the Order Pool selected on the canvas, use the configuration panel on the right side to select your Order Pool Settings.
Step 5: Save, Preview, and Activate Your Page
Save Your Changes:
Click Save to save the layout.
Preview the Page:
Click Preview to see how your page will look with the LWC in place. Ensure everything functions as expected.
Activate the Page:
Click Activate to publish your new page. You'll have options to set it as the default for the org, app, or profile levels depending on your needs.
Step 6: Access the New Page
After activation, navigate to the area (like your specific 24Flow app) where the page is included. You might need to add the page to the app's navigation menu:
Go to the App Manager, select your 24Flow app, click on "Edit," and then add your new page to the app’s navigation items.
This process will create a new custom page within your 24Flow environment, allowing you to effectively consult and use the Order Pool.
Order Pool Settings
The order pool settings are used to configure the actual layout of the screen of the Order Pool that the operations manager and/or planner will see.
In order to configure the order pool settings, please navigate to the app 24Flow Settings and then select the Order Pools Settings tab.
The order pool settings page contains the following parameters.
Information
Name: Name that you want to give to this set of order pool settings. It is possible to define multiple order pool settings.
Title: This is the display name of the order pool.
Parameters
Select Columns to Display: Allows you to select the columns that will be shown in the Order Pool component. Typical columns are: planned start date, name (name of the order), account, delivery date, product, quantity and last modified date. Via the Order Pool settings, you can add/remove additional fields of the Production Order
Note that you cannot select fields of a related object.
The number of columns that can be shown in the Order Pool is by default set to 7. This ensures maximum readability and avoids an overload of information.
In case you would like to override this default setting, navigate to Setup > Custom Settings > 24Flow Settings and edit the Order Pool Field Count parameter.
Select Fields to Search: Order Pool allows operations managers to search for particular orders in the order pool. This setting allows you to select the particular fields on which a search can be executed. Partial match works on text fields but not on (multi)picklists where an exact match is required.
Select Fields to Sort: You can determine the order into which the orders are displayed in the Order Pool. Most often, the orders are ranked chronologically based on the start date, where orders with the earliest start date appear at the top.
Release Button Location: Select to either have a Global release button, a release button per production order, or both.
Filter: It is possible to add filters. Only production orders that match the filter will be shown in the Order Pool.
Stock Settings
Show Material Availability: determines whether or not you see a material availability column in the order pool.
Select Operation Product Columns to Display: determines the columns that will be displayed when hoovering over/clicking on the Material availability icon.
Select Statuses that are considered 'In Stock': the Material Availability icon is green only if all items are considered in stock.
Other Settings
Show Sub-production Orders: If an order contains suborders you can decide whether or not to show suborders in the order pool. In case the main order is released, all suborders are released automatically, regardless of whether they are shown in the order pool. It is also possible to release suborders without releasing the main order. E.g. it may be desirable to release the main order for final assembly when all subassemblies are available, i.e. when the corresponding suborders have been completed.
Select Main Production Order: Selecting all sub production orders will also select the main production order.
Select Sub Production Orders: Selecting the main production order will automatically result in the selection of the sub-production orders.
Show Release Lateness KPI: show the release lateness KPI in the Order Pool, see the Order Pool introduction section for a definition of Release Lateness.
Load Quantity: determines the number of orders to be shown in the Order Pool upon initial load (this guarantees performance in case there are many orders in the Order Pool). Additional orders can then be displayed either through the Infinite Scroll setting or via a Load More button.
Infinite Scroll: enable infinite scroll on the Order Pool.
Expand by Default: When activated, orders with suborders are expanded by default.